 Starting a game
Just a few good reminders: always choose “raging horde” as the level of barbarian activities. This not only adds a 25 point bonus at the end, it also gives you 150 Gold when you capture a barbarian leader — the amount given is higher for higher barbarian activity. Although barbarians at this level may be overwhelming and may capture one of your cities, the chance is very low if you stationed 2 phalanxes, for example, in the beginning of the game, and built the city wall improvement or the Great Wall. At the “customize rules” screen, remember to check “don’t restart eliminated players”; this way the civilizations you’ve conquered will not resurrect overtime. I suggest you play your first game on “Chieftain level”, for it is the easiest, then play your second game on “Prince level”, third game using the “King level”, in other words, one game per level in gradually harder sequence. (I often play on Emperor level, by the way) After this setting adjustment, at the main screen, I preferred to turn off “auto save each turn” because you can save easily by yourself, but this feature is useful if you frequently forget to save the game.
 A good start
Let’s get to the real thing now…. Your first settler unit should not spend more than 3 turns looking for a good location to built a city. In fact, I usually build my first city at where the settler stands, unless there is a truly great location adjacent or the initial position is desert or tundra. This saves you precious time at the beginning. After you have built your first city, choose to build the unit with highest movement point first, such as horseman (research horseback riding if necessary). After the first unit is completed, move it to explore the surroundings, then change production to settlers. As one pointed out, the golden rule for this game is “Populate to Accumulate“, you will need many settlers to keep building cities and irrigate city squares. At the same time don’t overlook your city’s defense since your enemies may be nearby and the occurrence of barbarians is unpredictable. At the beginning of the game, you just have to take the risk.
As your units explore the unknown squares, you may discover “goody huts” . These huts are mini tribes that lacked the necessities to become competing civilizations. Instead they may be awed by your civilization’s greatness and may offer to join you for free when your units enter the huts. In other cases, they may present you with valuables or knowledge that is unknown to you. A less favorable outcome is that they could be insulted by your unit’s arrogance and they would appear as a bunch of barbarians attacking you. Due to these random events, it’s a good practice to save the game before entering a goody hut in order to get a satisfying outcome. In multiplayer games, you should still visit the huts as soon as possible because benefits outweighed the risk.
Soon your units will encounter other competing civilizations’ units. If a competing culture resides on the same continent as yours, your first priority is to conquer it to ensure sole access to the continent’s resource and your own safety. If you find yourself on a small island, you should research Map Making and build trireme as soon as possible. It should not take long to reach another island or continent. After you have uploaded the unit, use the trireme to get a rough outline of the continent or island by traveling along the coast. In summary, rapid exploration and expansion are vital to success.
There are a few Wonders that can accelerate your empire’s growth in the beginning. The first one is the Pyramid that acts as a granary in each of your cities and its effect does not expire. The second one is the Great Wall that acts as a city wall for each of your cities; although its effect will expire after the discovery of metallurgy, it provides each of your cities with a city wall at the early stage of your empire’s development. You do not need to pay any upkeep fees for the granaries provided by the Pyramid (this is true for all Wonders with “universal” effect). These two Wonders should be built as soon as possible.If you have to choose between the two, pick Pyramid. On deity level, however, Pyramid is not a must because rapid population growth could result in massive unhappiness and Great Wall is preferred. I don’t find Lighthouse very useful (If you started on a tiny island, then Lighthouse is very important). Another early Wonder is the Oracle, which doubles the effectiveness of your temples and will expire after the discovery of Theology. It’s not an essential wonder, at least not on Emperor or lower levels.
Domestic Management
Building cities
Many factors should be taken into account when selecting good sites to build cities. For strategic defense, in the beginning of the game you should build your cities along the coastline and on lands close to the boundary of your opponents. Building along coastline allows more naval exploration and an impressive naval force later in the game. Also, you are more able to prevent establishments by distant civilizations. Do not build cities in the center of your territory until you have built enough cities along the borders — territory claim is very important; you will have an ample amount of time to build cities in the “inner” territory of your empire.
It’s best to build cities on grassland and plain with 2 to 3 forests and 1 to 2 mountains or hills within the city radius.Rivers are also ideal sites because they have more trade and give your city a defense bonus. Avoid building on mountains and hills, unless it is a potentially dangerous location or has a special resource such as pheasants or coal.
Talking about special resources, your cities can have a maximum of 4. If you observe carefully you should be able to tell where to place your new city so that it encompasses 4 special resources; the resources are at the 4 extreme corners of the city radius.
How many cities do you want to build? As many as possible! However, you should know that when your empire is large, the cities farther away from your Capital will have more corruption and waste, and subsequently more unhappiness. This is a small price to pay for huge production potential in the future. Corruptions and wastes are eliminated or reduced when you switch to a more advance government type: communism, democracy, republic, or fundamentalism. If you own the Statute of Liberty, you can switch to more advance government types much earlier.
Never stop building cities and place your cities wisely.
Managing city squares
After you build 5 or 6 cities, you need to use some of your settlers units to improve city squares to make them as productive as possible. Grasslands, plains and desert should have roads and irrigations (if allowed); mountains and hills should be mined and have roads. Always build roads first before irrigating the square simply because it takes longer to irrigate. Building roads and railroads on every city square is important because of these benefits:
- More trade means more science, higher income and luxury. Roads are especially important in a republic or a democracy in reducing unhappiness.
- Lower corruption. If there is a road linking the city to the Capital city, corruption and waste are significantly lowered.
- Faster movement — the primary benefit of road. Having roads or railroads on every square is important in cleaning pollutions; roads allow your settlers and engineers to get to the polluted sites quickly. It’s no joke that roads could help you prevent a global warming!
- Linking all your cities on the same continent with railroads offers unprecedented offensive and defensive potential. If a city is being attacked by your enemy, you could send in reinforcements instantly and annihilate all the invading enemy units. On the other hand, you could use all your military units in attacking enemy cities on the same continent. Victory is almost guaranteed.
- Higher shield production. With railroads, mountains, hills, and forests produce one extra shield.
Therefore, roads and railroads on every city square are extremely beneficial.
One problem with roads and railroads is that foreign diplomats could infiltrate to the heart of your empire much faster. To minimize technology theft and loss of a city from revolt, create a perimeter defense and a network of diplomats or spy for anti-espionage purpose. Unfortunately, diplomats and spies are not very effective at anti-espionage. To slow down enemy spies, you should build a few fortresses on railroads and station 2 units in each of them. If you only station one unit, that unit is vulnerable to bribery. And watch out for diplomats and spies in boats! It’s hard to stop them if you don’t have a good navy.
Begin irrigating city squares for the second time once you discover Refrigeration advance. Set your cities to build supermarket once you have irrigated about half of the city squares. Many of the cities would have a food shortage when the population exceeds 20, depending on the terrain within the city radius. Build lots of settlers or engineers — in fact, it could be said that an empire has no future if it only has several engineers. Lastly, check your citizens once in a while so they are assigned to work in the most productive city squares — this changes often as you improve the city squares.
Managing Cities
After a city is built, you now need to decide what to build in the city. You could build either military units, city improvements, or Wonders. Knowing what to build at different time at different city is of ultimate importance.
Building Wonders
A city that is capable of building wonders should have the following characteristics: relatively high shield production, stable in terms of citizens’ happiness, and has an adequate defense. A high shield production enables a wonder to be completed faster than a city with lower shield production, obviously. With a stable city, you will not need to assign entertainers in the period of wonder building, and this in term makes shield production stable. Except in the beginning of the game, you should often choose cities that already have a temple and a coliseum to build wonders. Cities with these improvements are more stable than those without these improvements for a longer period of time. An adequate defense is one that has at least 2 military units, depending on the city’s location: higher if the city is near enemy cities and lower if it’s not. If your government is not a democracy, a republic, or a fundamentalist government, 3 is the minimum because they can maintain order at the same time.
Wonder building is like car racing; you often need to compete with your opponents for speed. How could you increase your chances of building a wonder before everyone else? There are several ways:
- Stay ahead in the science race. If you can discover an advance earlier than other civilizations, you can start building a particular wonder earlier than other civilizations.
- Money! As you know, money is good for many things. 🙂 If you receive a message saying that another civilization would finish building the wonder you are building next turn, you could ‘rush’ build the wonder by paying your workers a higher salary. This method is often expensive, but the benefits of some wonders are worth it. You just can’t miss some wonders…
- Build caravans and freights and move them into the wonder-building city. All shields went into producing the caravans and freights are instantly added to wonder building. If you have enough caravans or freights, you could build a wonder in one turn.
- Having multiple cities to build wonders at any time. If you want to build a particular wonder but has not yet discover the advance, set a city to build a wonder currently allowed, you could switch to the wonder you want to build when you discover that advance or have “acquired” it. It’s a good idea to have 2 to 3 cities building wonders at any time.
- If you have discovered Capitalization advance and your city has almost enough shields to complete a particular wonder, but you don’t want the wonder it’s building, you can change production to Capitalization and earn money. When you have the appropriate advance, just switch to the wonder you want to build; all the shields are still there intact. This way you successfully avoided wasting shields and earning money at the same time.
What wonders should you build? There is no absolute answer to this question because people have different values and style. There are some Top Ten Wonders Lists on the web, but don’t just take their words for it! After a few games you should be able to evaluate the importance of each wonder by yourself. Here I will only list and briefly describe those wonders that I often build: Pyramid gives your cities free granaries, Great Library gives you free tech already possessed by 3 other civilizations, Michelangelo’s Chapel gives your cities free cathedrals, Leonardo’s Workshop updates your troops for free automatically, J.S. Bach’s Cathedral increases your people’s happiness on the same continent where the Wonder is built, United Nations gives you embassies and some peace, SETI doubles your science output, Magellan’s Expedition makes your navy more formidable by allowing your ships to move a longer distance and attack more times, Adam Smith’s Company makes you rich and faster discovery because it allows you to set the tax rate lower and make the science rate higher, Hoover Dam gives you free hydro plants that increase factory output and also good for lowering pollution, Statute of Liberty gives you access to more advance government types faster and allows smoother government transition, Women’s Suffrage reduces unhappiness caused by units not stationed in the cities or fortresses in a republic or democratic government, and King Richard’s Crusade increases shield productions relatively early in the game and enables you to build/own more wonders as a result. It’s important to note that all 28 wonders have some values, and if resources permit, build as many as you can, just don’t miss the key wonders! If your opponents have built an important Wonder before you, it’s not the end of the world! Capture it and it will be yours (ok, I know it’s harder than it sounds 🙂 .
Building City Improvements
Before choosing which city improvement to build, you must be familiar with the various city improvements, both benefits and costs. Timing is very important in building city improvements. For example, aqueducts should be built when the city’s population is 8, and cities should start building sewer system when the population is 12, not lower. If you build them too early, you will probably face a budget deficit because all of them have maintenance costs, with the exception of City Walls. Also, building markets, banks, stock markets, libraries, and universities in cities with very low trade activity is a waste. Building a bank in a city that has an income of 2 Gold is a waste because the bank’s maintenance cost alone is 3 Gold. There are so many similar examples… you really need to know when to build each city improvement. Fortunately it’s fairly easy to see which structure is needed at a particular time.
Some players preferred to designate a particular city as a ‘trade city’ or ‘science city’. A trade city will have a market and a bank (even a stock market) before building any science improvements; a science city is the other way around. This may be a good idea because it potentially maximizes either trade or science in a city. But in practice there are difficulties. Banks, Stock markets, and Universities take much longer time than level one improvements (libraries and markets, etc). I believe larger city improvements should be built when the city is more capable in shield production, trade or science. The second difficulty is balance of trade cities and science cities; you need to keep track of the rough numbers of each type of city . I never follow the specialized-cities formula strictly…
Special Citizens
When a city’s population is above 5, you have the option to set some citizens as scientists, tax collectors, or entertainers, by clicking on the citizen icon(s) at the city production screen . Entertainers should be avoided in stable cities. In cities that have more science improvements, such as library, University, Newton’s College, scientists should be favored, in cities with high income, set tax collectors. It’s not a good idea to have too many special citizens because it would hamper the growth of the city due to fewer food and shields. Long term population growth is more important than short term gains in science and income. I only set special citizens in developed cities with a large population, greater than 12, and in cities with science and trade wonders.
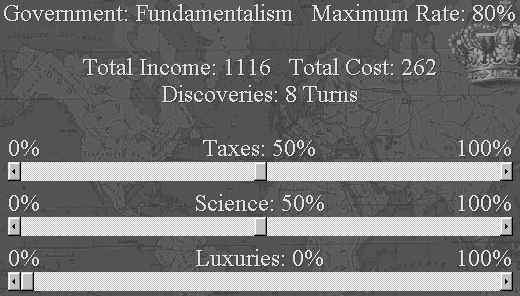
A balance between tax, science, and luxury
Luxury is not necessary early in the game. The default tax rate is just fine and requires no change for many years. During this time, military units and temples are sufficient to keep cities stable. Even if you set the luxury rate to 10% or 20%, the effect is almost negligible due to the small amount of trade in the cities. Once your government becomes a monarchy, or when the average city size is around 4 or 5, there is a need to adjust the tax rate to allow some luxury. A sample distribution rate is 60% science, 30% tax, 10% luxury. When you change to another government type, you must adjust the percent distribution to suit the characteristics of a particular government type. A republic or a democratic government should set at least 20% luxury; a communist government should set 10% luxury, and a fundamentalist government could set luxury to 0% — but higher doesn’t hurt because each happy citizen contributes an amount of gold per turn (known as ‘tithe’) in a fundamentalist government.
It pays to make your citizens happy. In a democracy, a city that has more happy citizens than content citizens, and has no unhappy citizens and enough food, the city population increases by 1 each turn. Because of this rapid increase in population, you may need to rush-build aqueducts or sewer systems at the thresholds of 8 and 12, in order to make the incrementation uninterrupted. Many players have taken advantage of this unique ability and set luxury rate higher than 50% for some time; I often let it run for 6 turns then set it back to normal. In a communist government, happy cities collect resources as in a democracy. Happy citizens also contribute more points than content citizens in final score calculation (2 points instead of 1). For this reason, you should set the luxury rate to maximum just before final score calculation.
Caravans and freights are essential
The basic idea behind Caravans is the Principle of Supply and Demand. Those who have taken an economic course should be very familiar with it. Since a city can’t possibly produce all the goods its citizens demand due to the limitation of resources, trade with other cities, foreign or domestic, is your only mean to satisfy the material demand of your citizens. In Civilization II, every city produces 3 types of products and demand 3 other different products at any time. It is your goal to try to satisfy your citizens every need and make their lives better and happier.
Caravans provide a mean of transporting goods between cities. The moment your caravans arrive at another city, you instantly gain an amount of gold from selling those goods. The amount of gold is determined by several factors:
- The distance between the two trading cities. The farther the distance, the higher the profit.
- Does that city demand your product? If yes, then you can sell them at a higher price and thus more profit.
- Which civilization owns that city? If it’s not your own city, then you will receive a higher profit. Maybe it’s because of the mystery behind imported goods…
- Do you have a peaceful relation with the civilization that owns that city? You will receive a lower amount of gold if you are at war with that civilization.
- The populations of the two trading cities. If both cities are large, then the profit will be higher. If the size of your city is small and the destination city is large, the income is only average because your city’s small population can not produce enough goods to satisfy the demand of the larger population.
- There’s a boost if the two cities are on different continents. Small islands make great trade centers. (From GJ)
These are basically the factors that affect the profit you receive from selling goods via caravans and freights. After you sell the goods, a trade route between the two cities is automatically established. There is no need to send caravans to that city anymore. Instead, the two cities will gain an increase in trade. Often times my cities gain 2 to 5 trade increase from one trade route (remember that a city could have 3 trade routes, which could mean up to 15 trade bonus at this rate!).This number changes from time to time as the two cities’ populations increase in number. I would suggest that you try to fulfill every demand of your citizens by trading between your own cities and foreign cities as early as possible. Freight is an improved version of the caravans; they can move 2 squares per turn instead of 1, although they have the same role. Caravans and freights are essential for a great economy.
Military
I just counted the number of units in Civilization II and the answer is 51 units, from the ancient warrior unit to nuclear missiles! Here they are:
| Type | Units | Total |
| Air | Bomber, Fighter, Helicopter, Stealth Bomber, Stealth Fighter, Cruise Missile, Nuclear Missile | 7 |
| Land | Alpine Troops, Archers, Armor, Artillery, Cannon, Caravan, Catapult, Cavalry, Chariot, Crusader, Diplomat, Dragoons, Elephants, Engineers, Explorers, Fanatics, Freight, Horseman, Howitzer, Knights, Legion, Marines, Mech. Infantry, Musketeer, Paratroopers, Partisans, Phalanx, Pikemen, Rifleman, Settlers, Spy, and Warriors | 32 |
| Naval | AEGIS Cruiser, Battleship, Caravel, Carrier, Cruiser, Destroyer, Frigate, Galleon, Ironclad, Submarine, Transport, and Trireme | 12 |
| Grand Total = | 51 |
For complete statistics, please visit this page.
“Wow…Impressive!” You said. “But what can I do with these units? How do I use them effectively??” Don’t worry… because you can’t build ALL of these units in 4000 BC (unless you use cheat codes). Maybe you don’t need to build them all — you may be able to conquer all your enemies in the musketeer age!
Things every player should know
Use a Combination of Units
Cities should have more than one type of units. The preferred combination is 1 defender (archer, pikemen, legion, musketeer, etc), 1 attacker (catapult, cannon, etc), and 1 mounted unit (horsemen, knight, Calvary, etc). The defender units will be useful when enemies attack your cities, the attackers can easily destroy any slow enemy units, and the mounted unit is good at offense and has fair defense — they are especially useful in destroying enemy diplomats because they can move 2 squares per turn. The defender and attacker unit are not effective against diplomats because they can only move 1 square per turn. One unit of each type should be sufficient for most cities.
Diplomats and Spies
Diplomats or spies are not needed inside your territory. You only need them in the border or coastal cities. Having diplomats and spies in border cities also make it easy for you to quickly send them to enemy cities. In emergency situations, having 1 or 2 diplomats in a city could mean victory or defeat. They could bribe enemy units and you can then use the newly joined units to attack other enemy units. Although it’s expensive to bribe enemy units, you just have to spend the money in order to save your city under some (rare) circumstances. Diplomats and spies can be seen as reserved forces against enemies and barbarians.
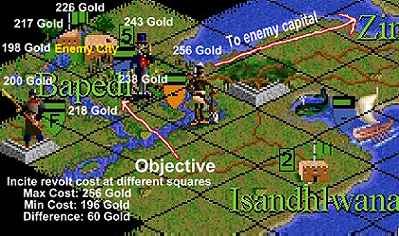
Inciting revolts in your rivals’ cities is one of the most effective way to capture enemy cities because all the units and improvements in the city are intact and the city population only decrease by one (I think). You also avoid losing units. Early in the game, most enemy cities are very cheap, some cost less than 100 Gold. As the population of the city grows and as the government changes, the cost becomes increasingly higher. A prosperous city later in the game could cost 8000 Gold! The incite revolt cost is determined by the following factors:
- the happiness of its citizens
- the size of the city
- the distance between the city and it’s capital
- the government type
- whether the city has courts
- whether the owner of that city has a Capital (or Palace).
- Is the city in riot? Lower cost if yes.
A trick in bribing cities: if a particular enemy’s capital is to the South, you should incite revolt at the northern edge of the city; if the enemy capital is in the east, then you should incite revolt at the western edge. In other words, your goal is to maximize the distance between your diplomat and your enemy’s capital. The price difference is significant. Click here to see a graphical representation of incite revolt cost.
Terrain and Fortresses
It’s important to consider the terrain in defending a city. If a square next to your city has a mountain or a hill, you should not let your enemies move troops to that square. You should build a fortress there beforehand and put some 2 or three units in there. Of course, having fortresses at the corner of the city radius could also block your enemies from moving into strategically important locations. In fact, having fortresses at the corners of the city radius is a more efficient method; a city could have more than one mountains and hills and building fortresses on all of them is to much work. Similar to diplomats, fortresses are only needed for border cities. The benefits of fortress are:
- Units in the fortress gain a defense bonus
- Your stacked units don’t get killed at once
- You get increased defense from enemy diplomats and spies because you can spot them earlier. They also cannot bride your stacked units.
- Units in fortresses within a city radius do not cause unhappiness in a democratic or republic government.
Roads should be established between the fortresses and the city in order to facilitate the movement of troops.
Navy: Queen of the Sea
Navy has important impacts on exploration, transportation, and in military. Here I will mainly talk about the military use of naval units.
Before ironclad, earlier naval units are not effective in bombarding enemy cities. Their main purpose is exploration. Indeed, if you use them well you can have the largest empire without much difficulty. You can also use them to transport military units to other islands or continents and possibly take a few enemy cities.
Ironclads are somewhat useful in attacking enemy units and cities if your opponents do not have coastal fortress or musketeers. They are capable of destroying the lower level units such as pikemen and legion. You should never use them to attack cities that have coastal fortress or musketeers stationed inside. And since ironclads have more firepower than wooden ships, you can use them to destroy any triremes, caravels, and galleons.
Destroyers are your first modern naval unit.. Their line of sight is greater than earlier naval units and thus are good for exploration and destroying enemy submarines. Their attack power is similar to that of ironclad, so don’t use them to attack enemy cities if they have coastal fortress or musketeers.
Cruisers are much better in attacking enemies than previous naval units. You can use them to attack cities that have musketeers or even cities that have coastal fortress (but NOT cities that have coastal fortress AND rifleman, if you don’t want to rely on luck).
With ironclads, destroyers, and cruisers, you can attack enemy units that are adjacent to the ocean. If you see any settlers or engineer units, be sure to attack them with your metallic ships! If you patrol enemy coastlines often you should be able to destroy some settlers and engineers units. Also, units such as catapults, cannons, caravans, and crusaders are easy targets if they are not stationed inside a city. Destroying those units along the coastline will force your opponents to build more of those units to replace them (we want to waste their resources).
You all have witnessed the power of battleships… They are expensive, but they can take lots of punishment. In one game, my veteran battleship was still alive after six cruise missile attacks in the same turn! A combination of battleships, cruisers, and transports is very effective in taking over enemy cities.
AEGIS cruiser is just a normal cruiser with added anti-air capabilities. If your enemies have a good air force or a large arsenal of missiles, then AEGIS cruisers are excellent for defending your ships, especially your transports. If your enemies don’t have a good air force, then there is no need to build AEGIS cruisers.
And finally there is submarine… They have very low defense and can be destroyed by any naval unit starting from ironclad. Submarines (attack power 10) are deadly if you attack first, just like cannons and catapults. In most cases, if you can move a longer distance per turn than your enemy’s naval units, your submarine can attack first and kill any naval unit except the battleship.
“First attack” is very important in civ2 and you should do all that’s necessary to improve your naval units’ speed. There are three possible ways:
- Research the “Navigation” technology
- Build Magellan’s Expedition!
- Research fusion power
Your naval units can move at least 4 squares more if you have all three. (correct me if I am wrong, I am writing from memory here…)
This increase in speed not only allows your naval units to move faster, but also allow them to attack more times, as long as their sustained damage is below 50% (or no yellow color health bar) and the movement point is not used up. For example, if your battleship (assumed 7 movement points) is right next to an enemy city, you can attack a maximum of 7 times if its health is still good after each attack!
More on submarines: Stationing one or two submarines in a city can be very useful sometimes. Suppose your enemy attacked your city with a battleship, you may lose one rifleman, but you can unleash your submarines next turn and destroy that battleship easily since it must be injured. One rifleman for a battleship is a pretty good exchange rate. 🙂 And have I mentioned that you can equip your submarines with nuclear missiles?
Another tips, if your enemy has many ships stacked together or within a few squares, use a nuclear missile! It will not cause any pollution in the ocean.
| Player Input: submitted by David Wendelken on 2/12/00. |
|
Navy? To Be or Not To Be, that is the question. First, a qualification is in order. I have only played against the AI. Personally, it is a rare game that I build a navy unit (other than for transport). I find them expensive and rarely useful. Of course, if I was playing a game with lots and lots of small islands, I might change my strategy! The few occasions that I use one are when someone has a veteran Ironclad and I can’t get the rifleman advance quickly. If the other person’s navy is a bother, I just figure out their “shipping lanes” to my territory. I then build a city on a coastal mountain astride their sea route to my territory. It almost always becomes a “ship magnet” where countless fleets of ships dash themselves against the rocks and sink. As for crossing the ocean, I find narrow crossing points where the transporting ship can make it in one pass. The ships carry an engineer who builds a city which the ship then sails into. I make sure I have enough gold to build city walls and garrison the city with the rest of the transport’s cargo. If the ocean is too wide to sail across in one setting, then make peace! Load up several transports with spies, engineers and howitzers and have fun when you disembark on the opposite shore. |
Air Force: Ruler of the Sky
| Player Input: submitted by Dave on 3/7/00 |
|
The only thing the airforce is good for You can generally be pretty sure if there are any fighters stationed in a city u are about to attack, if this is the case u can place an air unit on top of a pile of ground units (howitzers or whatever) in a square adjacent to the city making it impossible for a unit from the city to destroy your force. I rarely use plane for anything else. |
~ END OF BASICS OF WAR ~