 Opening Play Sequences
|
Quick Start Challenge Items below this point
Known Bugs and Glitches |
Matching your strategy, traits, terrain, and tasks Strategy is the big banana here but it involves looking forty, eighty or even several hundred turns into the future. Strategic thinking involves making choices based on what those choices will allow you to do at some point in the future and not necessarily just basing your decision on the immediate benefits. Following a rigid build sequence is not strategy unless the conditions of terrain, game conditions, opponents, and your special traits are the same as the foundation upon which the strategy was developed. For the purpose of this initial discussion, we will focus only on the opening choices in your capital city because they illustrate the basic principles that can be applied in other situations.
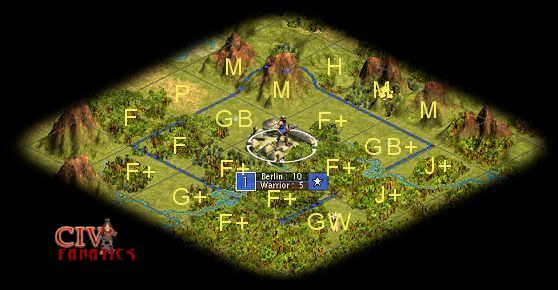
First, assess the terrain and resources you have available. Raw terrain squares for your capital city can exist in one of eight basic terrain types (mountains, desert, tundra, coastal water, hills, bonus grassland, and plains). On top of these terrain types, there can be three types of overlays (forest, jungle, rivers). Rivers do not actually exist in a square of terrain but cover the edge between two adjacent squares. Because of this feature, one river has an effect on two different squares and it also effect the movement and combat between the two squares. Rivers affect all terrain types by adding an additional commerce unit to any square that has a river along one side. Rivers have a special effect on deserts in that they convert adjacent squares of desert into fertile flood plains. This means that the Flood plain terrain type is really just a desert square with a river adjacent to it. Forests and jungles are actually listed as terrain types in the Civ3 software documentation but it is helpful to look at them as overlays because they can be removed to expose the base terrain that lies underneath. Forests and jungles exist as overlays to grassland and plains while forest can also overlay tundra. In addition to these terrain types and overlays, each square can potentially have one special resource that can give luxury, bonus, or strategic benefits to your civilization. Luxury and strategy resources have bonus values as well and can increase the food, production, or gold produced from a given square. You earn the luxury and strategic benefit from a resource whenever it is connected to your capital by roads, harbors, and/or airports and covered by your territory or a colony. You get these benefits even if there is no citizen assign to work those resource squares. The bonus values from resources are only earned when a citizen can work the square internally to a city’s cultural boundary. Resources can only appear in selected types of terrain. In the early game, there are resources that increase the food production from a square (wheat, game, cattle, wine, fish, and whales) and there are resources that increase the shield production from a square (cattle, whales, furs and eventually iron). All of the other resources produce primarily a financial benefit by producing extra gold when they are on a square worked by a citizen.
When you found your capital city, the town will initially have boundaries and a size that sets a 3 x 3 block of nine terrain squares. At the end of eight turns of game play, your palace in the capital city will have provided you with enough culture to expand your boundaries out to the 21 square area that looks like a fat plus symbol or a fat X shaped footprint. Your culture boundary may continue to expand, but this 21 square footprint is as large as the workable terrain for your city will ever grow.
Initial terrain development is almost always completed under the despotism form of government and this may limit the developed value of certain terrain squares so you must factor this value into your assessment. After despotism, you will almost always switch to a more enlightened form of government which will eliminate the despotism terrain penalty. You should consider this future developed status even if it is not a major factor in your initial decisions. A third major impact to terrain productivity will be available to you after steam power enables railroads, but again this factor will have little impact on your initial sequence of choices. A big part of your strategic assessment of the terrain is for you to focus in on how the game is actually played and recognize that only four to six (4 to 6) of the initial terrain squares will be used to produce 99% of the results during the opening game sequence. Even though you will have 21 squares to choose from, and all those squares may eventually be used, only those tiles that can be worked by citizens in the early game will produce direct benefit. You want to identify the most powerful squares within your boundaries and come up with a plan that can maximize the benefit from these squares in the minimum amount of time. This is a major part of how you win the game because it is like putting in place a big multiplier factor that then goes to increase everything else that happens in your game. NOTE: This does not imply that you should only improve the 4 to 6 most powerful squares to gain an advantage. The power of the squares is only the first factor you must consider in your decision process. The table below lists most of the powerful terrain squares in the game:
* in the table above indicates
that the output from the square has been reduced by 1 due to despotism Note 1: On these terrain types you have the choice of whether to irrigate or mine to increase the power of the square. Irrigation will cost fewer worker turns and will increase food while mining will cost you 50% more worker turns and will increase shields. You have to look at the balance of what you need from the town to support the strategy you intend to follow and these decisions are discussed in further detail on subsequent pages of this article. Note 2: In general, you want to avoid improving hills in the early game, because every task consumes twice as many worker turns. The exception to this rule has to do with the first hill or mountain that contains a luxury resource. Because this resource will make one person happy in every city that can be connected to it by roads, the luxury resource takes on a special priority. It is rarely of any value to hook up a second copy of the same resource in the early game, so choose the location wisely and then bypass the other copies of the luxury if they do not pass the test of value based purely on the power they give to your strategy. Note 3: You will notice that most of the luxury resources are omitted from the table above because they enhance the production of gold from a square but usually occur in locations where the food production is less that the minimum required to support the citizen that will work on the square. In the early game, almost all strategies will be limited to some extent by food production. For this reason you may need to build a road to hook up the luxury resource while recognizing that you may not gain any production of commercial benefits right away.
Identifying the most powerful terrain square in your start position This procedure may sound like a great deal of boring detail, but once you have identified the basic skills involved in the process, then it will become almost second nature for you. When you are first learning to do this task, you can open the city display for a town that has already been founded and then click on the one existing citizen to move it around to different squares so you can see what those tiles will produce. There is also a preference option in the preferences control menu that will allow you to turn on tiny display blips that will indicate the number of food and shield units that any given terrain square will produce (this option can be accessed in the game by hitting CNTRL-P and then making sure the “Show Food and Shields on Map” option is activated.) When you look at the 20
squares of terrain that will be available around the center square of your
city, you technically can choose the most powerful In the table above, you will notice some of the terrain types highlighted in bold. These are the most common of the terrain types that you should encounter that may deliver extra power to your position. You want to look closely to see if you have any of the other power squares available; the ones with something extra added to the squares that are located higher up in the table. It will be unusual for you to have more than one or two of these extra power squares in your starting city position. It will not be uncommon for you to have none of the extra power squares. If you have several squares that are all equally powerful, then we will use the next several steps to assign a level of importance to these power squares.
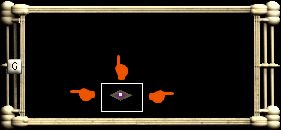
Adjusting Power Assessment for Map Position, Rivers, and Proximity Mobility plays a big part in the success of early game strategies. Under ideal circumstances you never want to walk across the same piece of terrain twice with the same unit. In the early, game you must use units to reach out and explore territory in order to find more bonuses, more resources, and positions for new cities, contacts with other civilizations, and any potential threats or dangers that may endanger your civilization.
General terrain knowledge also plays a role in assessing your map position so you can determine the priority directions for your early roads and early movement. You will generally find more powerful terrain if you can move away from tundra and away from jungle. Jungles can hide significant power but initially they take two to three times as much worker effort to develop as other terrain types. Rivers add economic power to your start position and facilitate irrigation but they impede your movement that might otherwise be enhanced by building roads. If life were perfect you would be able to build all your early improvements on one side of the river or at most have only one river crossing in your territory. Every square in the developable area of your city that has one side of the square covered by a river should have its power assessment increased by 1 (except for flood plains which have this bonus already built in). The final adjustment to how you prioritize the power squares in your start position should be based on proximity to your city center square and/or one of the top two most powerful squares in your city’s 21 square operating territory. If your most powerful terrain square is located in one of the eight squares immediately adjacent to your city center, it defines a general direction of development that will place you next to three or four squares in the outer ring. If the most powerful terrain square is in the outer ring of your city territory, then there will be two or three squares that are located between that power square and the city center.
Summary Now that we have covered the basics of start position assessment, we want to review the key activities and then move on to a few examples. To develop a good assessment of your start position your need to master some quick skills for: · Understanding basic terrain values · Assessing the most powerful terrain squares in your start position · Understanding your relative position in the world and what this means for expected movement directions. · Adjusting your terrain power and position assessments for the positive and negative impact of rivers · Prioritizing terrain squares based on proximity to your key assets. Before we move to decision making that combines this strategic first assessment of terrain with a knowledge of civilization special abilities and the strategy you wish to follow, we want to step through a couple of illustrate examples to make sure you have a clear picture of the concepts covered above. · A German mixed terrain example from GOTM8 · An Iroquois Grassland example from GOTM10 ·
A Russian Flood Plain example from
GOTM8
Other related topics:
|
 -
-  -
- 

©
2002 by cracker@CivFanatics.com
All rights reserved. Please read the Terms
of Use.
Send mail to our webmaster with technical
questions about or potential problems with this web site.