 Grassland Power Opening
|
Quick Start Challenge Items below this point
Known Bugs and Glitches |
This example is taken directly from one of the AI player positions in the GOTM10 August 2002 game where the human player started as the French on Regent difficulty; Pangaea land mass with restless barbarians. This example goes into a little bit less detail than the first example while processing through the key assessment steps but in the end the summary and analysis is a bit more detailed. If you would like to try your own skills at this developing this start position you may download the exact map that was used for GOTM10 with all the civilizations and barbarians located in the same opening positions. This scenario file will only run in V1.29 or later version of Civ3 but will allow you to load the game and choose which one of the eight civilizations you will play as. If you played the original GOTM game from a save file, this new scenario file will let you try your hand at being one of your original opponents and then compare your skill to that of the AI players in your original game. You can also look at how the AI plays your original French start position if you really want to gain an entertaining perspective on the game. Click here to download this GOTM10 scenario file for the original start positions. To use the file you will need to use the “Load Scenario” command in the opening game menu and then browse and find this “gotm10_original_start.bic” file in the location on your hard drive. You may choose the civilization you would like to play as, but for this example you will need to choose the Iroquois. All other options are preset to the correct values to replicate the original game but you can feel free to experiment if you would like to try different difficulty levels.
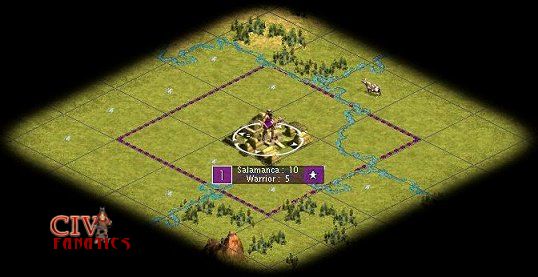
Understanding the basic terrain This is also an outstanding start position. In the hands of a master and working with the Iroquois, the rest of the world trembles in fear at the thought of Hiawatha starting in this position.
The most powerful square in this start position is the cow grassland and it starts off with a raw power of 5 by virtue of being located next to the river. Even under despotism, you can increase the power of your cow square up to a 7 and you will still have two options as to how this square is fully developed.
Looking at how the AI would play this position? The AI player would initially only see this position as the nine starting squares and would not consider the big picture global position or general strategy choices in its decision process as to which squares to improve first. Looking closely at the eight squares of the inner ring there are four bonus grassland squares to choose from and all four are next to a river. This set of choices is basically a four way tie in the AI’s programming. The AI just chooses one of the four squares without necessarily making the best choice to set up a good following move. In this case the AI chooses the middle square southeast of the town and moves there to build a road and a mine. After improving this square, the AI moves directly to the cow square without improving any squares in between and then builds a road and a MINE on the cow. After the cow is improved, the AI moves back across three squares through the town and onto the bonus grassland square southwest of the town. After a road and a mine is completed at the location, the AI worker loads up and travels cross country to the forest square located far north of town and northwest of the cow square. The AI’s chosen move sequence is only addressing the individual square values and is not building a coherent network or considering the cost of wasted interim moves. The AI move sequence in this case used 54 moves {move-road(3)-mine(6)-move-move-road(3)-mine(6)-move-move-move-road(3)-mine(6)-move-move-clear(10)-road(3)-mine(6) }. The moves shown in red are wasted by duplicate effort and essentially lose the values of 14 out of the AI player’s first 54 moves for about 25% wasted effort. What makes this wasted effort even more of a mistake is that the road network and improvement sequence is not even connected into a coherent part of a strategy to build an integrated and functioning empire. You can replicate this poor strategic approach by simply selecting the Automate command button for the starting worker. Your worker will then follow the same decision rules as would be used to assign the workers for the AI players. The problems with this automation choice will be that your worker: · Will not consider the big picture map position in any of its task choices. · Will ignore the impact of rivers on movement benefits from roads. · Will not complete tasks in a sequence that complements the tasks you have in the production queue. · Will not make choices between two possible options in ways that compliments your strategy. · Will waste at least one worker movement turn for every ten turns of work completed. · Will abandon any task when threatened, even if the worker could complete the task and still safely run away. · Will not prioritize strategic improvements such as road or irrigation extensions to future cities. An interesting observation that comes from watching the AI automated workers is that the settlement of new towns and the observations from explorer units do not tend to alter the worker task selection early in the improvement cycle. The first fifty to sixty worker moves are always the same for any given start position regardless of what happens in the world around the worker. The exception would be if a worker was disturbed by a passing barbarian or enemy unit.
The Power Improvement Sequence There is only one really powerful improvement sequence for this start position because the power of the cow next to the river is so dominant. The first worker moves must be use to put you into a position to reach the cow as quickly as possible while getting the quickest benefit from your very first worker task turns. You could move out in a straight line to the cow but that would be a bad move for two reasons. First, it would move to improve a common grassland square that would be initially ranked as a fifth priority. Second, moving through this common grassland square would not give you access to the choice of moving northwest or northeast based on how your exploration evolves. The best square to improve first is the bonus grassland square directly north of the town. You can move to that location and add a road in four total worker turns or you could get there and add a mine in seven total worker turns. Regardless of the choice you make, when your city boundaries expand at turn 10 your city will have grown a second citizen and the city governor will assign the second citizen to immediately begin production from the cow square. Also remember that the cow will be on the far side of the river so there will be no movement benefit associated with the road in the first square when you try to move back across the river. For this reason, the sequence of worker improvement moves that I would implement would be {move-mine(6)-move across river to cow-irrigate(4)-road(3)-move back across river-road(3) }. This sequence would consume 19 worker turns and would yield us a total of 12 extra shields, 7 extra food units, and 4 extra gold compared to the undeveloped do nothing case. If we followed a straight sequence of road-mine-road-irrigate, that sequence would yield 15 extra gold and 9 extra shields from the first square and 5 extra gold from the second square. In the power sequence we traded 16 gold coins to earn 7 extra food and 3 additional shields in the same timeframe and we end up in exactly the same map configuration as the straight improvement sequence.
Opening movement sequences are not implemented in a total vacuum that ignores other factors in the game surroundings. The strategy you choose and the information you gain from other sources will impact your choice of moves as the game progresses. In this game example, we have and expansionist civilization that gives us an additional scout unit right from the start of the game. Because we are sending our worker to improve (and explore) to the northeast, I would probably send my scout to the west. If we are following an early expansion strategy that actually sets the foundation for almost all game play options, then we would not expect our population in the capital city to go over the four pop points level in the early game because we will be pulling out settlers and workers as quickly as the population and shield production could sustain those units. After our initial improvements to the cow square and the bonus grass land square that connects it back to the town, we would only need to improve two more squares to have our basic economy really cranking along.
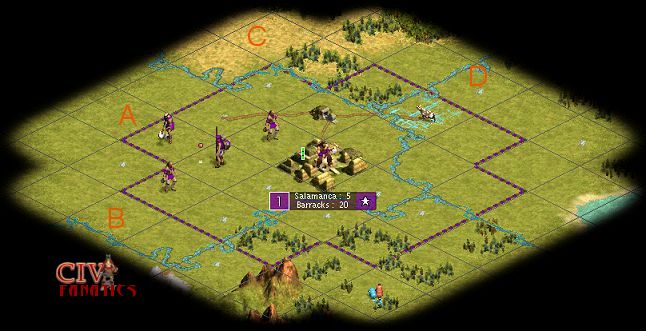
In the image above, I have deliberately not sent the scouts out to explore and I have the two settlers just stacked in the field so you can see them. This image is captured just at the beginning of 2710 BC when the second settler has been completed. Our unit production has completed two settlers, a warrior, and an additional scout. The worker could have easily been assigned to complete road in the square marked with an A and that would have opened up a quicker route to the northwest for reinforcements to follow the second settler. Our scout would have exposed a great deal of the terrain that lies to the west and our second scout would have headed northeast beyond the area marked with the letter D. There is coast to our southeast and the top of the snow covered peak to our southwest strongly hints of tundra and other colder terrain. Our first settler was produced in 3150 BC and could have been routed to follow the first scout or headed south to settle beyond the silks that were exposed when our boundaries expanded to the view you see above. The silk position is important because it will increase our productive citizen population that can happily work to expand the empire, but our global map position tells us that those silks are probably in our private backyard while we may face competition for any resources that exist in the other three compass directions. Getting out and settled in the other three directions quickly is key to controlling more important resources in the game. Next Example – How would the automated functions play a Flood Plain start position from GOTM8?
Other related topics:
|
 -
-  -
- 

©
2002 by cracker@CivFanatics.com
All rights reserved. Please read the Terms
of Use.
Send mail to our webmaster with technical
questions about or potential problems with this web site.