 Mixed Terrain Opening
|
Quick Start Challenge Items below this point
Known Bugs and Glitches |
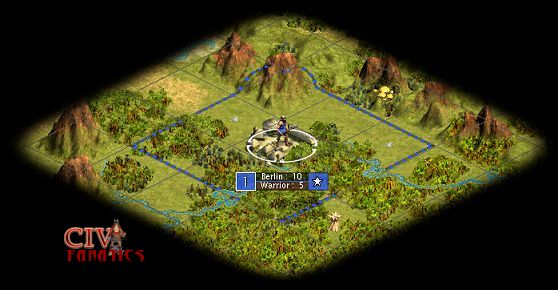
This example is taken directly from the GOTM8 June 2002 game where the human player started as the Germans on Monarch difficulty, continent land masses with raging barbarians. If you would like to try your own skills at this developing this start position you may download the exact map that was used for GOTM8 with all the civilizations and barbarians located in the same opening positions. Click here for the instructions to download the GOTM8 start positions replay scenario. Understanding the basic terrain Remember that this process of understanding basic terrain is independent of the civilization involved in the discussion, so this whole exercise could be applied to any civilization that started in a similar position. First, we want to look at the starting position and identify the terrain features we will have available to shape the destiny of our civilization. The image below displays the standard nine square starting boundary but you need to mentally expand this boundary to include the three additional squares that will be added to extend each side of the existing square territory. This image does not have the preference turned on to display the food and shield blips for each terrain square. I usually do not play with that option activated so that it will make the bonus grassland squares stand out more for me to see them easily. Note also, that this image is using the standard graphics package. There are several terrain graphics modification packages that can make it easier for you tell the difference between terrain types such as forest and jungle if you need help in this visual area.
In the real Civ3 game you could right mouse click on any terrain square to confirm its status and the value of the square in terms of its food, shields, and commerce production. In the image above, I can identify the following terrain tiles that will be within our 21 tile city boundaries.
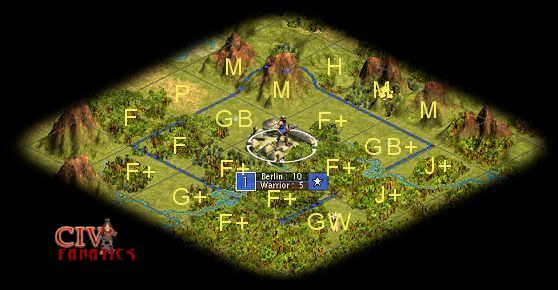
This is actually a very strong start position for some strategies because it possesses a mixture of terrain types that will allow the player to select for maximum food production or shift to maximum shield production just by choosing different tiles to work. The inventory of eight forest squares also provides a major bonus to early production if these squares can be cleared at the appropriate times using our early forestry skills. If we visualized the map with letter labels to indicate what each terrain square would be, that image would look something like:
Note that I have added a plus symbol to each tile that will receive an extra gold production bonus due to its location next to the river. The most powerful square in this city position is actual the bonus grassland square located just east of the town. Because this square gains a gold bonus from the river its raw power of 3 would be increased to 4 and then could be further increase to a total of 6 of improved with a road and a mine. Note also that the raw power of the forest squares next to the river (indicated by F+) is also a 4 but these squares cannot be increased to a power of 6 as quickly because it will take more worker turns to improve their value. Not all of the F+ squares will be able to improve to a 6 power square. The second most powerful square in this start position is probably one of the F+ squares but we cannot be sure which of these squares will reveal bonus grassland or just simple grassland when cleared. One of the F+ squares is more valuable than all the other F+ squares because of its position adjacent to a larger number of powerful squares that can be quickly improved. Can you identify this square? (see answer below).
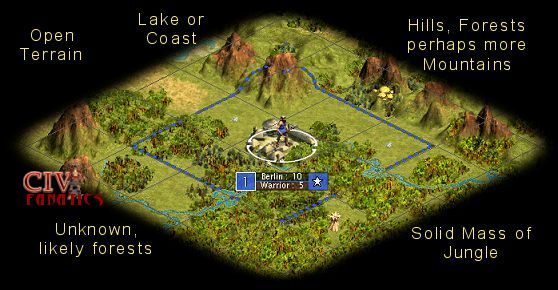
What does your relative position in the world tell you?
Remember that technically the map is continuous and could wrap around so that land to the east of your start position could be continuous all the way into the western portion of the world. Being located in the middle of the map is good from an options standpoint but is not always as easy as a start position that is located to the extreme north or south. On this map we know that we have six opponents and that continental landmasses will mean that the world is subdivided into at least two larger continents which probably have at least 2 or 3 civilizations per landmass. A central start position with no obvious coastline nearby means that we could head in any one of the 4 major compass directions to uncover more of the world and potentially encounter our neighbors. A closer look at our detailed map view gives us an even better set of hints about the terrain we can expect in the various directions.
This terrain assessment leads us to not want to initially prioritize improvements that will head east or south. We can expect some open terrain that is probably easier to settle and develop if we are able to push our improvements out to the northwest. To the southwest and west we do not know what to expect but since we are on the edge of a transition zone with jungle to the east and southeast with plains to the northwest, we can expect that the southwest might be more forest and jungle terrain. Getting an exploratory unit over onto the mountain peak that is due west of our city will reveal a great deal that may help us update our decision making processes. This assessment of our position in the world gives us two strong reasons to complete our initial improvements north of the river that divides our territory into two halves. Our most powerful square is just to the east of town but still north of the river and then we have a probably settlement direction that is off to the northeast. Our third priority would seem to be to cross the river and get into improving squares that will bring the wheat square up to full power but that decision process will rest on some proximity analysis.
Understand the military and movement impact of the river
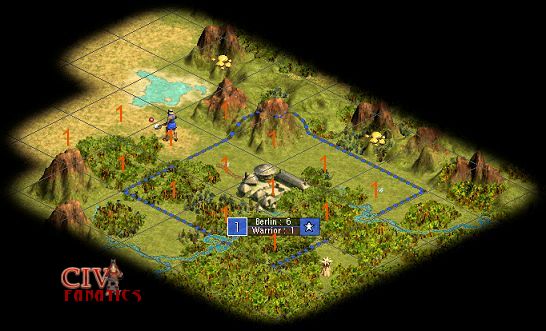
Rivers can somewhat disrupt this movement pattern in the early game, and create a situation that favors road networks that cross a river only once if at all possible. A very good example of this road network expansion as impacted by the river can be found if we examine the choice to develop from Berlin to the plains square we can see to the northwest. In the image below, our worker has moved out from town using one turn and then used 3 turns to build a road segment and then used 1 more turn to move onto the plains square. The worker currently has the choice of building more roads or moving into any one of the squares immediately adjacent to its current position. If the worker completes the road, it will be able to move back along the road and town network to any of the squares marked with an orange 1 to indicate they are all within one turn’s movement allowance. The worker technically will have a choice of 15 different displacement choices if the road is completed.
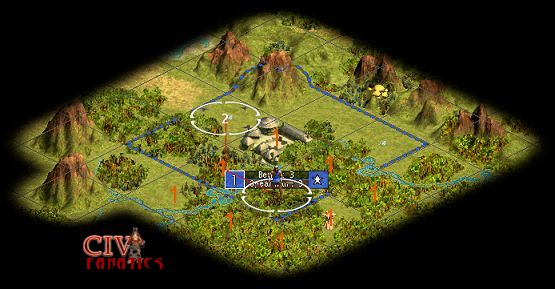
If we take the same worker and cross the river directly into the F+ forest square south of town, we can use our worker to build a road using six turns of labor. The problem with this terrain location is that it is on the opposite side of the river from the town and as a result a break in the road network reduces any movement benefits that may have been gained. If you look at the example image below, even after completing the road our unit will still only be able to move into the squares marked with an orange 1 which essentially is the same range of movement that the unit would have had without the road. It would take two moves to reach the grassland square shown by the 2 in the movement circle pointer. Initially this one piece of road had no military or movement benefit to our civilization and because our population is too low to support enough citizens to work this square we also gain no commercial benefit.
Understanding how the river impacts your movement choices is important in this start position because it reinforces that you do not want to cross the river except under circumstances when you would need to move into a square that would only allow you one square of movement even if adjacent roads are in place. In the image above, the worker is standing in one of the F+ squares located such that its development will open up access to virtually all the high value squares on that side of the river. From this one square, workers and other units can reach most of the other bonus squares in a single turn. This is the one F+ square that technically has a more powerful position by virtue of its proximity to other valuable squares.
Identifying the four main choices Our analysis of the power of the terrain squares in our territory combined with their relative positions leads us to develop three main strategic options. Our first option would be to develop the most powerful Grassland Bonus square by adding a road and a mine and then to follow those moves with a sequence that extends a road out towards the northeast to support our initial growth area. This sequence of moves would consume 28 worker turns {move-road(3)-mine(6)-move-road(3)-move-road(3)-step back and mine(6)-step forward and irrigate(4)}. This option will gain us two gold and two shields over the unimproved conditions but will increase our settlement speed to the northwest. Our second option would be to cross the river immediately and develop out to the wheat bonus. This sequence of moves would consume 26 worker turns {move-clear(10)-road(3)-move-road(3)-step back and irrigate(4)-step forward and irrigate(4)}. This option will increase our production by three gold and one food units compared to the unimproved conditions and will yield a one time bonus of ten shields if we time the forestry event correctly. A third option that starts like option one but switches to option two would develop the power square first and then cross the river to develop toward the wheat square. This sequence of moves would consume 36 worker turns {move-road(3)-mine(6)-move-clear(10)-road(3)-move-road(3)-step back and irrigate(4)-step forward and irrigate(4)}. This option increases our production by 4 gold, 1 shield, and 1 food unit and could also yield the forestry bonus of ten shields. What the AI player would do: It is helpful to know how your opponent would play the situation as you evaluate your options. The AI player would basically ignore all this analysis and would begin developing to the northwest. After the worker completed a road and a mine on the bonus grassland square to the northwest of town he would move back through town and across the river, through a forest square without working and onto the wheat square. After building a standalone piece of road and a mine under the wheat, the automated worker would wade through the jungle and cross the river to begin work on improving the power square just east of the town by adding a road and a mine. In the first move sequence, the AI player only considers the 8 possible squares that are immediately adjacent to the town because the other 12 territory squares that you can consider would be classified as outside of the AI territory. This total move sequence will consume 32 worker turns {move-road(3)-mine(6)-move-move-road(3)-mine(6)-move-move-road(3)-mine(6)} and will not increase the food production rate or growth rate for the city. It would increase the shield production rate for the town to a total of at least 6 shields per turn if the population was at 3 or above. What happens if you do nothing? – It is also helpful to know what happens if you construct no improvements using your worker. This case might apply if the worker were destroyed by barbarians or an enemy of if the worker moved off to another task. With no changes in place, the city governor will assign a citizen to the most powerful square until the city gains a pop point and the cultural boundaries expand in 3500BC at turn 10. Then the second citizen will work the wheat square and produce three food units per turn. The third citizen will be hatched at turn 17 and the AI will assign this citizen to work the next bonus grassland if you emphasize food or one of the forest squares next to the river if you emphasize production.
Quickest sustainable path to the first new town For most strategies, the winning sequence of moves involves getting to an expanded empire size of 10 to 12 cities as quickly as possible. This does not mean that producing the first settler first will win the game, but it does imply that producing new towns as quickly as possible will generally be a better move than waiting for a turn or two if all things are equal. In this start position, the unimproved growth rate will put you in a position to build the first settler on turn 17. There is only one square that can be used to increase your growth rate under despotism and this is the wheat square. The absolute earliest possible date that you could improve that square would be by following a cut throat version of option two as listed above that would clear one block of forest and irrigate out to the wheat without building any roads. It would take a minimum of 20 worker turns to complete this task which would technically complete too late to impact the option of building the first possible settler. So cutting corners in an attempt to hurry the first settler will miss that objective and will probably not yield a positive long term benefit. Shield production will start off at two shields per turn and will move up from that point in time forward. By turn 7 or 10, this number will increase at least to three shields per turn and could be temporarily increased to five shields per turn. Two shields per turn would support completion of a 30 shields settler on turn 15 which would be 2 turns before the population reached a high enough level to complete the build. You must complete a warrior or your choice of an archer or spearman to use up early shields until the population can sustain a settler output. Building the settler is not the only part of the race that matters. Ultimately the measure of success involves getting the settler on the ground as a productive town. Using option 1, our settler could found his new town in 1 to 3 turns after he is born somewhere between turn 17 and turn 19. Using options two or three (or the AI plan) it may take 4 to 6 turns for the settler to reach its planned home.
Summary Each of the opening sequences of moves for our German start position will hold certain advantages when matched with certain big picture strategies. Getting the first new town settled quickly is very important but ultimately the prize is won by developing a number of other cities as quickly as possible and in a sustainable pattern of development. For these reasons, the strongest opening sequence of moves for this position would be to choose the third option that boosts the power square and then increases the food production rate. This option is very close to choosing option two because both options gain the 10 shield production boost that can be used to upgrade a warrior to a spearman or archer and both options increase the early growth rate for the civilization from one population point every 7 turns to one population point every 5 turns. Next Example – A Grassland Start Position from GOTM10
Other related topics:
|
 -
-  -
- 


©
2002 by cracker@CivFanatics.com
All rights reserved. Please read the Terms
of Use.
Send mail to our webmaster with technical
questions about or potential problems with this web site.