 Relocating the First Settler
|
Quick Start Challenge Items below this point
Known Bugs and Glitches |
Again, if you would like to try your own skills at this developing this start position you may download the exact map that was used for GOTM8 with all the civilizations and barbarians located in the same opening positions. Click here for the instructions to download the GOTM8 start positions replay scenario.
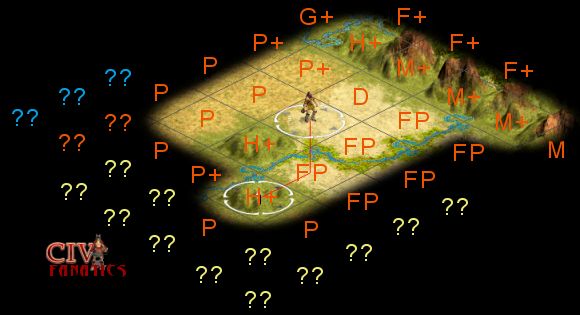
There are really very few good reasons for you not to take your first settler and plop that first city down right where you start the game. Moving your first settler will put you one turn behind in the game and will usually move you one step closer to your enemies and any barbarians that may exist on the map. When you consider the option to move rather than settle, it must generally be based on a significant gain in position that will offset the loss of ten points of score plus the first turn’s value in growth, production, commerce, and research. There are several conditions that might indicate that an initial settler move is a good idea: 1. The start position is located right on top of a cow or wheat bonus or other high food value square. 2. The start position is in the middle of hostile terrain or a very isolated position. 3. The start position is one square away from contact with the coast. 4. If you can see a substantial military advantage that will be gained by a move of one square. There may be other good reasons to consider the opening move versus settle option, but the four reasons listed above make up my primary reasons that would drive me to look further at the move option. In this Russian start position example there is no visible coast, so we can exclude reason number 3 in the list above. If we look closely at our starting square and check the terrain info option from the right click menu, we will find that we are standing in a flood plain square. To our southwest there are six more flood plain squares that will all be located within our boundaries if we take this start position. All of these squares can never be improved to produce even one shield of production per turn. There will be lots of food for growth, but shield balance may be a problem. Flood plains also carry the risk of disease that can kill off our civilian population. We could consider a start position in the middle of a mass of flood plain to meet the definition of “hostile terrain” in reason number 2 above. In the V1.21 and subsequent patches, the food production from the center square of any town or city has been fixed at two food units no matter what the real food production for the terrain and/or bonus resources might really support. This limit is the reason that you will often want to move off of a cow or wheat resource. Flood plain squares have the capacity to produce three or four food units when improved, so you could view this position as partially meeting the test for reason number 1 above.
In this position we are lucky enough to be an expansionist civilization and this gives us a scout unit that can provide us with more information to help evaluate our terrain options before we make our final decision.
Scouting the position before making a final decision This start position continues to illustrate how important it is to understand that your strategy must be matched to the terrain and the special abilities of the civilization that you choose to play. We might consider moving our initial settler with any civilization we might play, but the scouting benefit of playing as an expansionist civilization gives us several choices that can reduce the risk of delaying the settlement of our capital city.
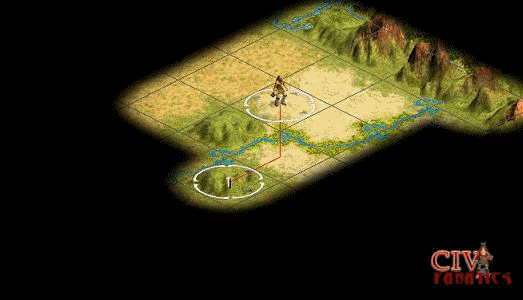
Even without moving any units, we can inventory our surrounding terrain squares and project what the squares just beyond our full view might look like. If we move our scout unit straight to the west, we will reveal the unknown terrain squares indicated by the blue and orange double question marks. If we move our scout to the hill south of our current position, we will use the same number of moves but will benefit from the fact that a unit on a hill will be able to see out twice as far. This scout move would reveal twice as many new terrain squares to help us decide if moving our settler really is the best move.
The scout movement reveals the content of almost all the terrain squares that will be included in the territory of our capital city. This view makes it easier to evaluate the differences between the terrain power of our opening start position versus the terrain power of our anticipated new capital location on the first hill. The table below lists the terrain squares that were lost from the northeast side of the position and compares those squares to the new squares that would be gained on the southwest edge if we relocated our settler to the hill.
There is no loss in total terrain power by switching between the two positions, but in the move gives up five terrain squares in the opening position that would see no use during the ancient and middle ages. In exchange we only gain only one square of little value and several valuable squares that would may not be able to use just because we have too much power to use with a maximum population limit of twelve citizens. These squares that would be of little use in either case are highlighted in rust brown colored text in the table above.
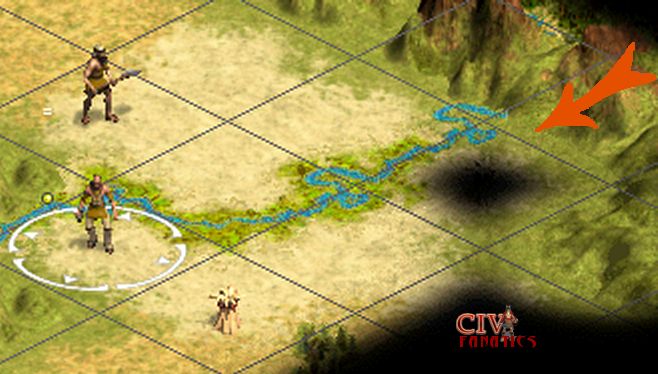
Pointing out how to see the second Wheat bonus This is a minor sidebar topic, but if you look very closely at the map in the opening moves, you can actually see the northeast wheat resource peeking out from under the black fog. This is not blatantly obvious and most people would miss it in the opening decision processes but it is clearly visible in a zoomed in graphic without using any sort of cheats or other graphics mods. What makes the wheat visible is the reflected splash from the adjacent mountain square that just barely reveals the top of the wheat sheaf. You will see a similar effect from hills and mountains on many maps. I have adopted a practice of checking some terrain squares very closely when I think it might influence my opening move decisions. The decision to move the settler up onto the hill reveals the resource anyway, but it was still a nice piece of information to know.
Taking the plunge So we take the risk and jump up on top of the hill. What do we think this buys us??
Let us finish up this investigation of starting positions and opening move sequences for Civ3 by looking at how we might play this relocated Russian settler. Then we can compare the various approaches and perhaps try our own skills at a few “Quick Start Challenges.” Continuing this example by – Playing the Relocating Settler Position
Other related topics:
|
 -
-  -
- 


©
2002 by cracker@CivFanatics.com
All rights reserved. Please read the Terms
of Use.
Send mail to our webmaster with technical
questions about or potential problems with this web site.