 Flood Plain Opening Sequence
|
Quick Start Challenge Items below this point
Known Bugs and Glitches |
We will go through this example once using the exact start position used by the AI player. Then we will start over and play through the same start position using two different strategy variations that will allow us to compare the different results that might be obtained to improve on the basic performance. If you would like to try your own skills at this developing this start position you may download the exact map that was used for GOTM8 with all the civilizations and barbarians located in the same opening positions. Click here for the instructions to download the GOTM8 start positions replay scenario.
Looking at how the AI would play this position?
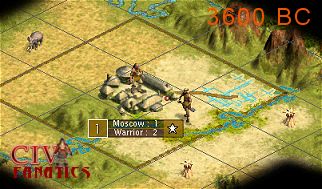
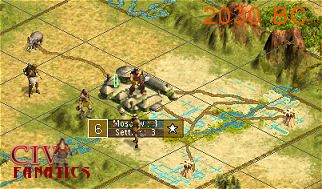
The year is 2030 BC, which is 17 turns later than the example grassland start position that showed the Iroquois in 2710BC with two settlers and two 10-point units already completed. There is a big difference in how the two terrain positions yield output from each square, but there is even a bigger difference in how the terrain positions mesh with the AI player’s fixed approach to worker tasking and game strategy. Since the algorithm that controls the AI player is ignoring a number of big picture issues and just focusing on building improvements on one square at a time, the power of the civilization can be severely hampered in what would normally be a very powerful position. If you are the human player in this start position and you automate your initial worker because you are either lazy or unsure what might be the best tasks to perform first, then you may have just signed your death warrant.
Understanding the basic terrain This start position illustrates how important it is to understand that your strategy must be matched to the terrain and the special abilities of the civilization that you choose to play. In this case, the start position presents a massive number of powerful food producing squares but all of these powerful squares cannot be improved to produce even one additional shield of production. This city location is an excellent people factory but will have substantial difficulty producing enough shields to build military units or improvements that will support the population growth.
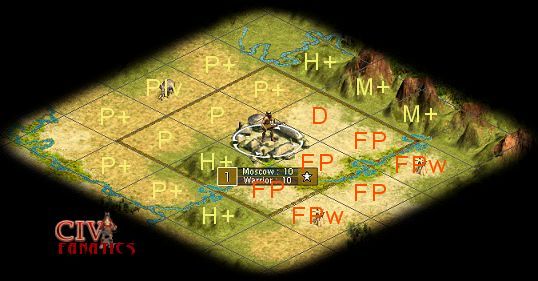
The fact that the two flood plain squares with the wheat bonuses represent the most powerful squares in this start position is fairly obvious, but the point that the AI and most players miss is that these squares are extreme food production without the capacity for any shield production support. Setting the wheat bonus squares and the ivory bonus squares aside, we can look at the next three terrain types and reach an interesting conclusion:
The river bonus increases the power of the hills and plains squares to be equal to the power of the flood plain squares. Plus you have the option that plains squares next to rivers can be mined or irrigated at essentially the same cost in terms of the number of worker turns. Clearly the plains squares next to rivers are a lot more valuable than the AI algorithm will lead you to believe.
Choosing improvements to increase production
Our analysis of the power squares has shown us that the plains squares next to rivers (P+) are at least as powerful as the flood plain squares (FP) under despotism. We also know that when the cultural borders of our capital expand on turn 10, our borders will include the two flood plains with wheat (FPw at a raw power of 5) and the plains with ivory square (PIv at a raw power of 4).
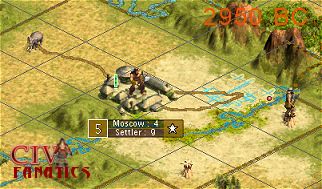
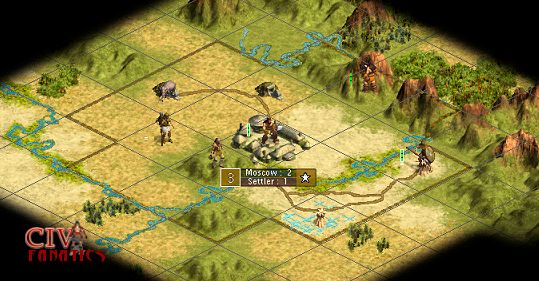
The actual sequence of worker tasks (road then mine vs mine then road) is significant in this case because the citizen population will be assigned to work on one of the flood plain squares unless we intervene to micromanage the production assignments. If we mine the P+ square first and micromanage the civilian population to work the square just as the mine is completed, we can speed the production of the first warrior unit, and put us in a position to then race forward towards an early settler. As soon as the population jumps to two citizens, you have to make sure the governor settings are properly selected to say “yes” to the “emphasize production” question and “no” to the emphasize food” question. Following this plan, it is possible to build the first settler in 3100 BC and then two more settlers in 2350BC and 1990BC respectively. Can also build one warrior and a spearman compared to the AI approach that was struggling to build just one settler and one warrior.
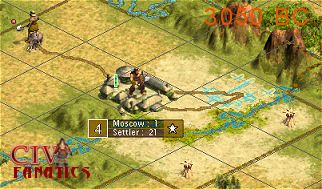
The image above shows the actual position in the year 2030 BC to compare to the picture of the result produced by the AI player’s improvement sequence. Instead of using the units properly to expand the civilization, I have just left them stacked near Moscow so you can compare the results to the image of 2030 BC in the AI’s plan as shown previously (click here to jump to that image). The actual worker move sequence that was followed in this plan consumed 44 worker turns { move-mine(6)-road(3)-move-mine(6)-road(3)-move to flood plain square south of Moscow-road(3)-move-road(3)-irrigate(4)-move-road(3)-move-road(3)-irrigate(4) } to complete irrigation and roads to both the flood plain wheat squares by the year 1990 BC.
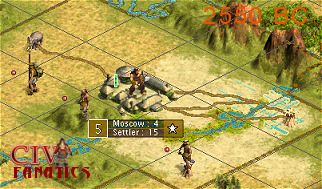
Summary We were able to substantially improve on the performance of the AI player program by placing strategic emphasis on the increasing the shield production of Moscow to provide some balance to the massive food production capacity of the flood plains and wheat bonus squares. The difference in the ending population of Moscow(6) in the AI approach versus the ending population in our strategic approach (3) can be reconciled by looking at the extra settler and the extra 20 shield defensive spearman that we were able to build. An observant player might notice that the AI approach of producing massive quantities of food could be used to potentially rush some improvements and units directly instead of shifting the improvement strategy to emphasize some shield production. Let us use this start position to test the strength of that “pop rushing” approach. Next Example – The same flood plain position with “pop rushing” in the post V1.29 game world.
Other related topics:
|
 -
-  -
- 


©
2002 by cracker@CivFanatics.com
All rights reserved. Please read the Terms
of Use.
Send mail to our webmaster with technical
questions about or potential problems with this web site.