 Early Forestry Operations
|
Quick Start Challenge Items below this point
Known Bugs and Glitches |
Jungle squares are one of the weakest possible squares in your start position and present one of the greatest challenges to develop into productive and fully contributing parts of your empire. A typical jungle terrain square will require between three and three and a half times more worker effort to improve the square to a point where it produces the same benefits as an equivalent square of plains or common grassland.
* - jungle squares will usually be
cleared to reveal grassland terrain and under normal conditions approximately
1/3rd of these squares will be bonus grassland. When forest
squares are cleared to reveal grassland, this same 1/3rd
probability of being a bonus square will generally apply.
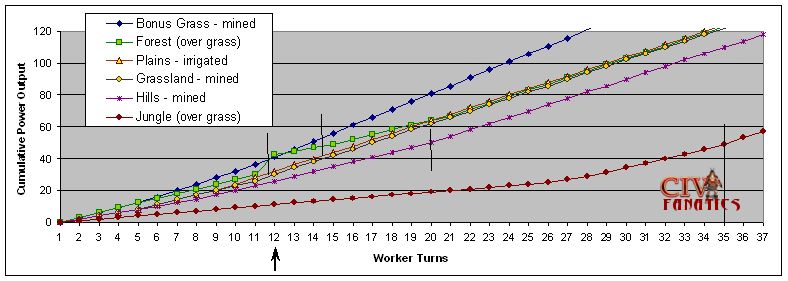
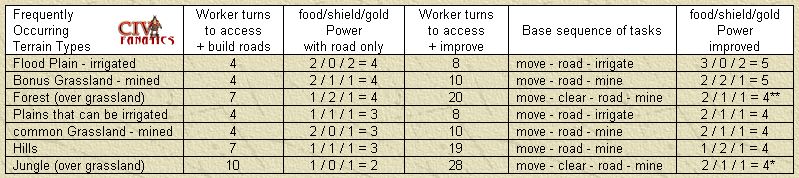
If you look at the table of frequently occurring terrain types as listed above, forest squares have the highest initial shield production and the highest shield production of any square that can be improved with only the addition of a road. It would take nineteen worker turns to improve a hill to produce the same power as can be derived from adding a road to a forest square in just seven worker turns. Since all of the frequently occurring terrain types shown in the table above can eventually be improved to a power output of 4 or 5 power units per turn, the final power value for the terrain square is not the only thing we need to understand. Timing of the worker tasks and a comparison of the cumulative power output over time is what we need to look at in order to better appreciate the value of the forest squares. The graph below displays the cumulative power output from one square of each of the terrain types as if that one square was the only square of terrain on the whole world. For each of the lines on the graph we use our worker to complete the base sequence of tasks shown in the table above and then just add up the output from each subsequent turn. The terrain types start off clustered together in three groups on the graph with Forest, Flood Plain, and Bonus Grassland setting a blistering pace on the top set of lines while Jungle and Mountains would be on the bottom set lines. Common Grassland (with no bonus), Hills, and Plains would be clustered together in the middle group of lines out until turn number 5 when they would begin to diverge. If you focus in on the blue line with diamonds that corresponds to the Bonus Grassland, you will see that this line begins to increase more rapidly beginning in turn number 5 and it pulls ahead of the output from the Forest square as represented by the bright green squares. It takes until turn number 11 for the worker assigned to the forest to complete the task of clearing the forest and then we would gain an instant bonus of ten shields of production that would temporarily put the total output from the forest square ahead of the Bonus Grassland square that now has a road and a mine and is producing fiver power units per turn. The cleared forest will now usually expose a grassland square which will only produce two power units per turn until the worker can complete a road plus a mine. By the end of turn number 20, the forest square has been fully converted to a common Grassland square with a road and a mine.
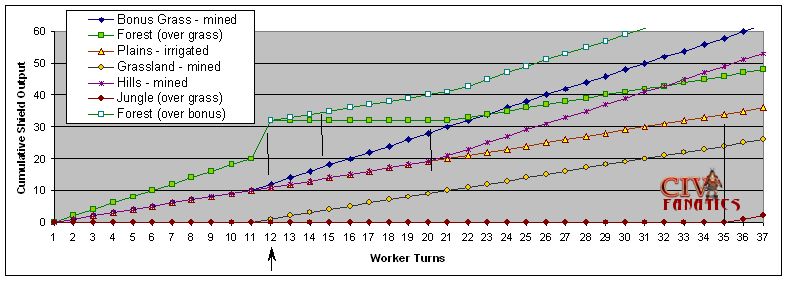
What is amazing from this graph, is that a forest square has the capacity to equal the power output of a bonus Grassland square when view on a short term basis. In the long run, the power of a fully improved bonus Grassland square will exceed the cumulative power of a fully improved forest square that has been converted to anything else (including if the forest was replanted. What is even more striking is if we look at the graph of the cumulative shield output from the same terrain squares over the same time frame. The shield output from the unimproved forest square plus the one time bonus of ten shields puts the cumulative shield output from a forest square so far ahead of the other terrain types that it takes a Bonus Grassland square eleven additional turns to catch up even after the forest has been cleared to bare grassland. I have added a continuation line to the graph below to represent the situation which would occur in approximately 1/3rd of the cases when a bonus grassland square would be exposed by the cleared forest. In this case, the cumulative output from the forest square over bonus grassland would permanently keep us about eleven shields ahead of the output from the naturally occurring bonus grassland square.
The conclusion we should draw from these graphs is that if we can make maximum use of the production bonus that comes from clearing a forest, we have the potential to substantially increase the short term production of shields from our towns without incurring long term losses in the overall power of our empire. The key point is to time the harvest of the shield bonus correctly.
Timing the forest bonus to match the production queue When a square of forest is cleared, the ten shield bonus is immediately dumped into the production queue to fill up to ten open spaces in the production cost of the current item that you have chosen to build. If the queue is currently set to build a worker that would cost a total of ten shields and there are already six shields in the production bin, the ten shields from the forest bonus will be used to fill the remaining four slots in the production bin and the excess six shields from the bonus will be thrown away and wasted. The worse case of this shield waste occurs when the production bin is virtually full and the expected output from the town will complete the unit or improvement in the next turn. In this case, the total amount of the ten shield forest bonus is wasted. To maximize the benefit from the forest bonus you need to make sure that the open spaces in the production queue are equal to or greater than the expected production output from the town plus ten open spaces to receive the forestry bonus. Early forest bonuses can most effectively be targeted at assisting in the production of units and improvements that cost twenty shields or more. In most cases, you will need to assign a worker to begin clearing the forest square while another item is expected to complete production just a few turns before the bonus shields from the forest will be harvested.
For the most part, the cost to fully improve the underlying terrain will be constant at twenty worker turns {move - clear (10) - road (3) - mine (6)}. The net short term benefit derived from those worker turns will depend on how well you time the application of the ten shield harvest bonus to the production queue and on the type of terrain that is revealed and finally improved.
So if the net short term benefit from clearing any forest square will always be negative when we look at that result when the same square is producing some quantity of food, shields and commerce for our civilization we have to find a way to harvest the good part of the benefit while our citizens are assigned to work on other more powerful squares that produce more output power than could be earned from the forest squares or cleared terrain. The discussion above was focused on Forest squares but can easily be extended to jungles because the jungle squares give no production bonus plus they cost fourteen additional standard worker turns to clear which increases the development cost up to a total of thirty-four standard worker turns. The big benefit that comes from clearing the jungle is really earned in the long term conversion of a one power jungle square up to a four or five power grassland type square. Even though there will be some disease risk, these differences in the costs and benefits of development will continue to discourage jungle clearing operations in favor of other task choices.
This conclusion is pretty easy to reach, but it only serves to drive home the point that you need to assess the power of the terrain squares in your start position and try to improve the three or four most powerful squares in that position in a cohesive strategy before you should seriously undertake forestry operations. If you can time a forest clearing operation to make full use of the ten shield bonus and use the cleared square to help improve your top power squares then integrate that ten shield bonus into your production plan and charge on.
Summary Timing early forestry operations to make sure you get to use the full ten shield production bonus may be the most important concern in deciding if and when to clear a square of forest. If at all possible, you should develop and improve enough terrain squares (usually about four non-forest or jungle squares) to make sure that your citizens can be working to their full potential without having to work on the same forest squares you may be clearing. Use this same decision process to avoid clearing jungle squares in the early game until you have developed other locations for your citizens to work. Remember to look closely at masses of forest and jungle to locate any potential rivers. You can detect the rivers next to forest and jungle squares by right clicking on the terrain square to see the terrain description. Empty unimproved squares of forest or jungle that show production of one extra gold unit will be located next to a river. The cost of building roads through forests and jungles also drives you to carefully consider the decision to clear these squares first before building the road. If a forest square or jungle square contains a key strategic or luxury resource, then you must determine at what timing this resource would need to be connected in order to produce a benefit. The two early game strategic resources of Horses and Iron will not occur in forests or jungle, so this decision process is almost always driven by looking at the happiness level that you can sustain within your towns by using military police and existing luxuries and improvements. If you have an early luxury resource in forests of jungle you should look to the next page of this article to decide which tactics to use to gain the most powerful early game position. Next Topic – City Placement and the Settler as a Mega-Lumberjack
Other related topics:
|
 -
-  -
- 

©
2002 by cracker@CivFanatics.com
All rights reserved. Please read the Terms
of Use.
Send mail to our webmaster with technical
questions about or potential problems with this web site.