 Engineered Forests
|
Quick Start Challenge Items below this point
Known Bugs and Glitches |
Engineering is one of the first tier techs in the middle ages. The image below displays the Middle Ages technology tree with engineering at the lower left hand corner. It is technically possible to race past engineering and get all the way to Democracy (the green highlighted research paths) before you ever discover the ability to plant forests, but many players will not proceed with this route because it includes no combat advantages.
The reason I highlight the democracy option, is because the worker efficiency rate would increase by 50% if we were in a democratic form of government. The discussion that follows will assume that most people are not in democracy when the first discover the ability to plant forests. If you happen to be one of the exceptions where your strategy has led you to discovery Democracy before you discover Engineering, then you should read the summary of this web page and skip directly to Intensive Forestry Operations.
Engineered Forests have two major benefits The knowledge to plant
forests gives your workers the ability to do two things: Tundra terrain is the only terrain type where forests have a direct power production benefit that is greater than other improvement options for that terrain (compare the two rows below with the orange squares):
Under conditions of equal waste and corruption, adding a square of forest to a tundra town will usually yield a greater benefit than adding a square of forest in other locations. One factor that influences this benefit is that most successful tundra town locations in the early game will be located on coastal squares where most of the population can produce food and commerce from the adjacent coastal waters. Any production that the town produces must come from some sort of bonus or improvements to the land squares. Adding a mine to a square near a tundra town will only gain one shield while adding a forest will usually gain two shields. (It will take until after railroads are discovered for the mined tundra square to have the ability to compete with the forest square.) Under basic game conditions, each tundra town can only make use of two forest squares plus one extra forest square for each food bonus from other resources:
If you have a tundra town with 1 game resource and 1 offshore fish resource this will not initially allow you to use extra forest squares until you get into a more enlightened form of government and get a harbor in place. After you get the harbor and get out of despotism, the town will be able to make use of up to five total forest squares { 2 (base) + 1 (game) + 2 (fish & harbor) } to produce shields for your empire. Before you discover the ability to replant forests, you should probably make sure you leave forests in place on tundra squares up to the number of extra forest squares that can be used by each town as shown in the table above. Since you cannot replace the forests in the early game, clearing too many forest squares will usually cause you more harm to your economy to lose the potential shield production for 80 to 100 turns versus the ten shield production bonus that might be gained. When you plant forests on a terrain square, you almost always want to build roads in the square first and then add the forest. Having the roads in place will let you potentially reinforce the planting and clearing tasks with additional workers without incurring a movement cost in terms of worker turns as long as you may have other workers near by. Look at the city display screens for your tundra towns to make sure they can use the bonus that might be produced from clearing the forests and use this status to decide if you should plant the forest now. Never use forest bonuses to build units in corrupt towns when you have some improvement that may be needed. Forest bonuses are not subject to corruption or disbanding conversion penalties so they constitute one of you most effective means of pumping extra shields into the economy of a frontier town. Since forestry bonuses can only be harvested once from each square, they are limited and should be used wisely. The typical coastal tundra town will only have access to 7 or 8 squares of potential forest harvest bonus which should yield 70 to 80 shields of added production. How you plant and harvest these bonuses should follow the general forestry patterns outline in the next section with the exception that you should add a worker or a team of three workers to replant the forests on an appropriate number of terrain squares as the forestry crew moves through the terrain surrounding a town.
Forestry for Profit and Production Boost To get the biggest bang for your worker turns of effort, you want the time from the first worker’s effort until the forest is harvested and used to be as short as possible. You also want to minimize the total number of worker turns required. The key point here is that the when the forest is harvested it yields a ten shield bonus that goes into the production bin, but it many be many turns later before the shields in the bin get turned into something useful. Recognize this timing and you can really increase the benefits obtained from your forestry operations. We will look at an example of this benefit after we list the recommended crew assignments to plant and clear forests. In general your forestry operations for profit will include the following tasks: move to the location (1 turn), build roads (3 turns), plant forest (9 turns), harvest forest (10 turns). Other operations such as adding improvements or restoring the forest may need to be performed but should be viewed as separate follow-up tasks. Because the 4 tasks that must be completed in the forestry sequence do not exist in the same integer multiple of a number of worker turns, the most efficient Forestry crews will be made up of groups of workers attacking the tasks on any given square in a rolling sequence. Let us use one of the recommended forestry crews as an example to illustrate how this works:
Recommended Task Sequence: Spread the three road workers out over three different squares and assign them to build roads. (will take 4 total turns to complete 3 segments). When the roads are complete, move these workers on to build more roads. When the first road segment is complete move the 3 worker planting team onto a square with roads and start planting forest (will take 3 turns). When the forest square has been planted, move the planters to a new square and begin planting more forests. Round up the lumberjacks and move 5 of them to a forest square and begin clearing forests (will take 2 turns). The key point is to assign workers to the three tasks in the expected team sizes of 1, 3, and 5 and to always have enough workers building roads to stay at least 3 turns ahead of the forest planting crew. The image at right shows the three individual road workers near the top and then the planting team of three workers and the harvest team of five working just below the town of Satsuma. This may be a bit hard to visualize until you have done it once or twice, but what it effectively does is allow you to harvest a forest bonus of ten shields once every 2.3 turns (2 turns most the time, 4 turns one out of six cycles). If you learn to manage this well, most of the time you will have the three road builders fanned out in front of a planting crew that is followed by the bigger lumberjack crew of five workers.
When you use a crew of eleven workers assigned to the tasks as 3x1:3:5 the common multiple or the turns required to complete the task pattern is 12 and the three road workers would complete 9 road segments in that time. The planting crew could plant 4 new forest squares and the lumberjacks could clear 6 squares of forest. The road crews will actually follow a pattern of move-road(3)-move-road(3)-gang up as a team of three and plant a forest(3)- and then repeat. You usually will not have all eleven workers available and in position right at the first turn, but if you are this lucky, then the planters and lumberjacks should begin their tasks on existing squares that already have roads or help build roads or plant forests in the appropriate team size of 1 or 3 workers until these tasks get slightly ahead. The key to understanding how to manage these work crews is to keep the road workers out in front of the planting crew which needs to be ahead of the harvesting crew. You never want the team of workers that follows to be more than two squares away from their next task assignment because this will waste extra worker turns in movement that does not immediately allow the workers to start their next planting or harvest task in the same turn. Timing and Assigning the Benefit continues to be critical Using these optimized Forestry crews will really start to crank out the forest bonuses at such a high rate that if you do not pay attention to what you are doing and plan ahead, you will end up wasting about 20% to 30% of the bonus output. There is no real excuse for this waste when you get a better handle on what you are doing. When in doubt, you should assign the lumberjacks to build a few turns worth of improvements before continuing to harvest forest squares.
To make sure that the harvest bonus gets assigned to the correct city, we need to open the city display screen and make certain that a citizen from Edo is assigned to work on the forest square at the time it is harvested. Timing and assigning the forest harvest benefits will be difficult for you to manage when you first begin to use these techniques. It takes some practice to develop a better sense of which squares you should plant forest on and begin harvesting at different points in time to maximize your bonus yield from the process. To help you get a better feel for this process of assigning teams of workers to build a Forestry Operations crew and to help you practice the timing and assignment of the harvest benefits, I have set up a practice scenario that gives you control of a civilization that has an 11 worker crew standing by to follow your instructions just as Engineering is discovered. Click here for instructions on downloading and configuring the practice scenario.
Advanced topics The example and the practice scenario show above are only one of the many basic options where Forestry Operation can be of great benefit. I tried to keep this simple and focused on the crew management skills that should be applicable to almost any circumstances. There are a number of advanced topics that apply when you can use forestry in tandem with “pop rushing” and “short rushing” techniques. These topics are more advanced and more complex in their timing. If there is sufficient interest in the topics, I will add some web pages and links to each topic as the interest warrants and time permits.
If each worker turn is viewed as having the value of one gold unit per turn (the support cost you would pay in Republic or Democracy), then you can look at the typical tasks that are required to develop, plant, and harvest a forest square and reach a conclusion that harvesting a forest usually costs between 23 and 25 units of gold per square. In exchange for these gold units you harvest a ten shield production bonus that equivalently costs you about 2.5 units of gold per shield. If you purchased the same quantity of shields by using the “hurry production” button in the city display screen, then each shield would cost you 4.0 units of gold per shield. Forestry operations in this mid game period are saving you at least 37% on the cost of speeding production of key improvements and military units for your empire while allowing you to dedicate cash to scientific research, unit upgrades and other key tasks. Put another way, players who use Forestry Operations can have three swordsmen or other assets while their opponents who do not use forestry operation will only have two. In the big picture view of the game, Engineering represents a technology trigger where you definitely should begin to group your workers into crews and then to work them across your empire in a productivity wave. You want to avoid moving the crews across big open spaces where they do not earn their pay while in route. The optimized eleven worker forestry crew that is outline above should be a skill that most players practice and incorporate into their game play. Crews of this type should be used to harvest the production benefits from terrain squares in your territory that can support forests. Follow this crew of workers with other workers or teams of workers to either build improvements that support long term growth and production or plant forests in tundra squares that otherwise would not be productive. Next Topic – Intensive Forestry Operations
Other related topics:
|
|||||||||||||||||||||||||||||||||||||||||||||||||||||||||||||||||||||||||||||||||||||||||||||||||||
 -
-  -
- 


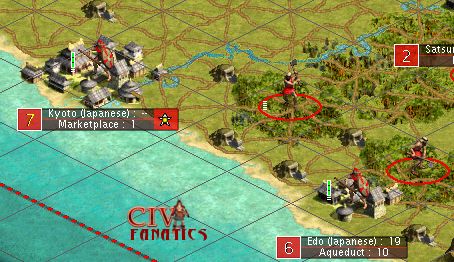 The image at left is an example
where the harvesting team is shown on a square that is exactly the same
distance from two different cities. Kyoto is just about to complete a
Marketplace and if it received the forestry harvest bonus of 10 additional
shields then all ten shields of the bonus would be wasted. Edo on the other hand is building an
Aqueduct with ten turns left to go and can make full use of the harvest
bonus.
The image at left is an example
where the harvesting team is shown on a square that is exactly the same
distance from two different cities. Kyoto is just about to complete a
Marketplace and if it received the forestry harvest bonus of 10 additional
shields then all ten shields of the bonus would be wasted. Edo on the other hand is building an
Aqueduct with ten turns left to go and can make full use of the harvest
bonus.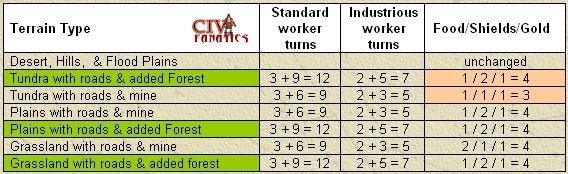
©
2002 by cracker@CivFanatics.com
All rights reserved. Please read the Terms
of Use.
Send mail to our webmaster with technical
questions about or potential problems with this web site.