 GOTM9 -
Consolidating the Central Advance
GOTM9 -
Consolidating the Central Advance
|
GOTM9 Index Items below this point
Known Bugs and Glitches |
Our planned northern thrust to the coast had been somewhat disrupted when the town of Fukushima evaporated, but we still had a minor chance of turning inland and linking up with the central advance on Kyoto. “Do
or Die” in taking Izumo
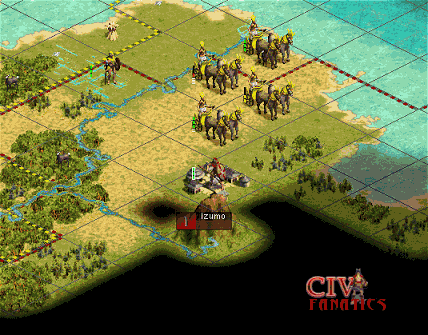
The new Japanese town to our south would be revealed to be named Izumo, and our forces within reach of the town included two 3 hit War Chariots, one 2 hit War Chariot, and four red-lined one hit War Chariots. Against two spearmen defenders in a town, these forces only had a 40% chance of winning and would probably suffer at least one or two fatalities during the assault. In most cases, I would have withdrawn the units to heal and then re-advance, but in this case I reasoned that I could use the first two units to attack as a probe and then retreat them away from the town if things went badly. Pressure in this area would help draw attention away from the main advance that was moving inland from the west. The first attacking War Chariot traded hits with the defending spearman and won its battle and a promotion to veteran status before withdrawing when confronted by the second defender. The second attacking War Chariot was loosing its battle with the second defender when it pulled even and then retreated. The final weak attacker had only 2 hit points to work with and lost one of those hit points before defeating the spearman and winning a promotion to elite status. The problem at this point was that an archer popped up as a defender. I had not anticipated this unit as a defender, since the chariots had been sitting in easy range for this archer to have attacked them in the last turn. Since the archer was unfortified, it must have just been completed from production. Note: A reasonable person might have retreated at this point in time because the chances of single hit point War Chariots killing a full strength defender would be fairly low. You would basically have to account for the chance that the defender might lose a hit point or two against an attacking chariot, but then the defender would win the first or second round and might possibly get promoted to a stronger status. I decided to risk the attack with the red lined chariots and after the first unit died, the second unit won its battle and captured the town.
My first moves were to consolidate the wounded units from the initial attack into >Toyama so they could heal while serving as garrison duty. I then advanced a number of full strength units out of Toyama and across the river into the forests in an attempt to deny the use of this forest to any troops that might try to counterattack from this direction using similar tactics that I had used when I advanced on Toyama from the north. One thing that I had forgotten to consider in the early planning and that now became a real pain was the movement penalty for crossing rivers before the technology of engineering had been discovered. I usually plan well for this movement barrier, but the early turns of this game had been played on our home continent where there were no rivers and I had been lulled into a false sense of “river forgetfulness” that now came back to haunt me for a few turns. Fortunately I was already researching engineering as part of the double whammy associated with the great library strategy (I research Engineering while all the AI players research Theology and/or Feudalism which I get out of the Great Library for free.) I also brought up veteran reserve units from the landing area at the rear and used these units to reinforce Toyama and/or provide protective cover for the road crews. As a final action in consolidating near Toyama, I decided that the captured catapult would be too slow to play any role in our planned advances and that I would be pushing forward enough units to make a counterattack directly on Toyama very unlikely. Toyama would need a cheap temple to keep its culture defense up at full strength and free up garrison troops to join the attack. I disbanded the captured catapult to contribute its value in shields to the production queue and then used cash to rush the remaining shields for the temple. I am still expecting a strong counterattack or two from the Japanese forces, but my guess at this point in time is that these battles will be fought in and around the rough mountain and forest terrain that lies to the southeast of Toyama.
I could also carefully examine the shape of the Japanese culture border and further refine my terrain estimate that fairly major Japanese city would lie just out of range of our view in the dark Fog of War below where you can see the CivFanatics watermark in the image file above.
Other related topics:
|


 ©
2002 by cracker@CivFanatics.com
©
2002 by cracker@CivFanatics.com
All rights reserved. Please read the Terms
of Use.
Send mail to our webmaster with technical
questions about or potential problems with this web site.