|
GOTM9 Index Items below this point
Known Bugs and Glitches |
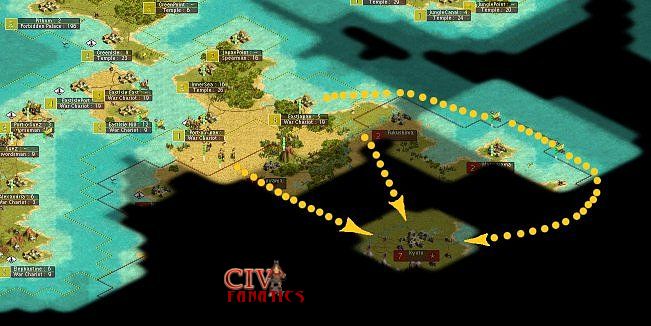
What are Military Orders? Campaign Objectives Routes of Advance Although an amphibious assault for the main attack did not seem to be the best choice, from the moment that I saw Kyoto was near to but not right directly on the coast, I had wanted to place an expeditionary force on that far coast to either confirm where the limits of the continent might actually be or to disrupt resource connections and access to any harbors that might exist. I was reasonably certain that the land mass on that side of Japan did not go on forever, otherwise Japan should have gained contact with some other civilization. Also, the fact that Japan had grown out to meet me on the western edge of their continent gave me further support for the guess that kyoto was over on the eastern edge of their landmass. So, based on my first whim about Kyoto, I decided to send two galleys with an initial load of four military units on a sort of "coastal end around" maneuver to land on the coast behind Kyoto. I included two war chariots, one spearman, and one swordsman in this force in the hope that they could land somewhere and either fortify on an important square or capture a minor harbor town and just hold out until reinforcements arrived. The galleys would slide back up the northern coast and pick up one round of reinforcements by water while a small land force would strike through and link up with amphibious force if necessary.
The main axis of attack would be on a line from the Egyptian town of Port-o-Japan directly toward Kyoto. This route of advance is shown as the western most dotted arrow in the map above and would take us through the young Japanese town of Toyama and hopefully through a Japanese city that was halfway betweemn Toyama and Kyoto. This unknown Japanese City would have been one of the first 3 or 4 cities founded by the Japanese and we were hoping it it would have a barracks that could be captured to support healing our military units and rushing more units if necessary.
Because our analysis of the map indicated that the central mass of forests might block our main advance or slow our ability to reinforce the minor water born attack force, I included a slightly smaller secondary axis of attack that would first capture/destroy the Japanese town of Fukushima on the northern coast and then turn inland on a direct line toward the north edge of Kyoto. The first objective of this advance would be to shorten the reinforcement route to the water born attack force by about 40%. The route inland toward Kyoto would be a backup plan to the main assault, just in case we encountered a terrain blockage. This second axis of land advance would also form either an eastern wing for a pincer movement or would allow us to push further eastward and link up with the water born force for a northern assault on Kyoto. Control of The Inland Sea
Because of the width of the inland sea, one galley could not cross the open space and
deliver unit to the other side in a single turn. However, two galleys could accomplish the task anywhere along the
sea by having two galley meet in the middle of the sea and allowing the units to cross from one galley to the next
while the galleys were lashed to gether with planks providing an easy walk across path. The key point here is that the
inland sea was essentially the same width all along its length from north to south, because the
crossing required the same number of turns and/or the same number of galley transfers. This set of observations about the inland sea, added a secondary objective for the main advancing thrust of the army. In addition to striking directly toward Kyoto, the units in this military force would exploit any opportunity to capture Japanese port cities along the coast of the inland sea. The first of these cities that we could identify was Nagoya where we had first contacted the Japanese and we could see that a harbor was in place in that city. Capturing these ports would reduce the length of our supply and reinforcement lines and would reduce the chance that an evil Japanese galley might pop out and disrupt the ferrying process that wopuld be bringing over additional forces on almost every turn. With three pairs of galleys operating as ferrying teams in the inland sea, we could deliver six new units across the inland sea in every two turns of the passage of time. (one to deliver and then one to return and reload the next manifest). Other related topics:
|
 ©
2002 by cracker@CivFanatics.com
©
2002 by cracker@CivFanatics.com
All rights reserved. Please read the Terms
of Use.
Send mail to our webmaster with technical
questions about or potential problems with this web site.
