 GOTM9 -
The Coastal Thrust toward Fukushima
|
GOTM9 Index Items below this point
Known Bugs and Glitches |
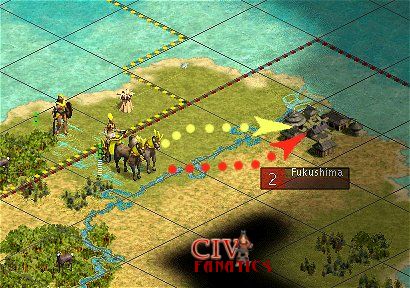
Our strike force skirting to the north of the central forest was tasked with capturing Fukushima on the northern coast, to shorten the lines or reinforcement for the sea route to support our far off landing site. This task force included a spearhead of eight war chariots backed up initially by a single spearman. Further reinforcements were coming up quickly from the rear to either extend this thrust toward Kyoto or load on the transport galleys to journey around to the landing site on horse point northeast of Kyoto. Choosing
the terrain
for the best possible path of attack
We could stay defensively
behind the river while advancing on the town and then attack across the
river. (yellow path) Alternatively, we could
cross the river and then attack into the city directly across the plains.
(red path) This one example provides an excellent illustration of why many CIV3 players may often relate stories of combat events that can include combat results that vary widely from the expected results. Two different players might choose the two different routes to the same objective if they did not understand the combat rules that the game uses. Carefully considering the terrain to be crossed and the terrain that you choose to occupy on your final movement stroke can increase your success rate by 25% to 50% in almost every game event.
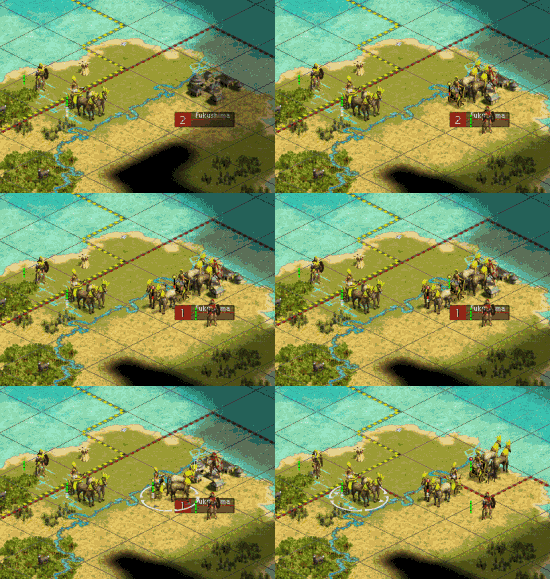
After carefully choosing the attack path, we moved forward the war chariots one at a time to attack Fukushima. Moving one unit at a time, allowed us to reevaluate the attack moves after each sequence and then implement changes in subsequent moves that might increase our future chances of success. (Note: In the animation sequence of the attack that follows, note that there is evidence of an unresolved software bug that results in Fukushima being destroyed instead of captured. You can see the bug in the animation but we discuss it elsewhere to avoid disrupting the strategy discussions.) The Destruction of
Fukushima
When our troops moved into Fukushima, the last remaining Japanese citizens burned their houses to the ground and ran away with all their tools and stored supplies. Nothing was left of the former Japanese town except a few traces of roadway and some wild deer that had escaped from the Japanese hunters. The retreat wildcard (Note: that if both units in the combat are classified as fast units then they will always fight it out to the death without chance of retreating.) Understanding the impact of the retreat capability can be the key to determining whether you have enough units to succeed of fail in the attack or defense role. Retreat can be good because it allows your units to survive the combat event and potentially participate in future uses. Retreat is bad in that it effectively reduces the number of chances that a unit has to win the combat event and also makes it slightly easier for the slow unit to get promoted to a stronger health position during the intervening period before another unit can attack or defend. This example of attacking Fukushima really only deals with the attacking version of combat when retreat by the attackers is a possibility. In this case, all of the attacking war chariots are regular units at full health with 3 possible hits. What this means is that each war chariot gets 2 possible attacks under normal combat rules, and then it has a 50/50 chance of retreating or continuing to attack to try and defeat the defending enemy. The actual combat sequence of strokes in this battle was:
The results of the win/loss outcomes for the combat between the war chariots and the spearman were almost exactly what was expected. In the end of the actual combat sequence we had one (1) full strength war chariot and three (3) redlined (wounded) war chariots that were technically exposed to counterattack if it materialized. Four war chariots were fully used up for that turn in order to complete the attack. For comparison, if we look at the same sequence of win/loss combat events but eliminate the chance of retreat then the combat sequence would look like:
In the no retreat example, we would have lost two war chariots but would have ended one(1) full strength war chariot that had been used up for the turn and one(1) full strength war chariot that could still be used to attack or defend another target.
Consolidating after the
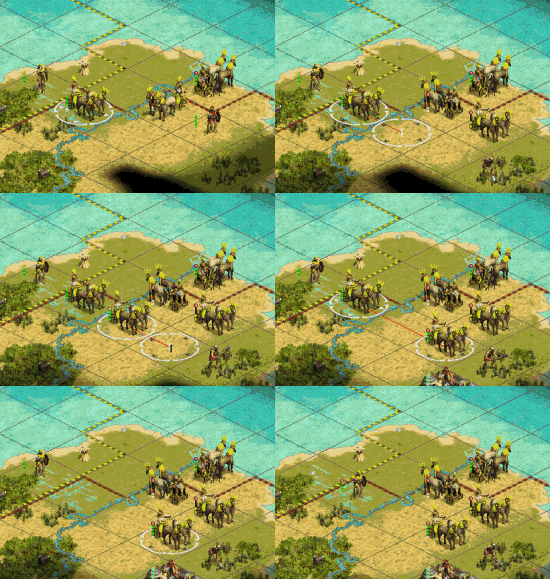
fall of Fukushima If the spearman was allowed to survive, it might retreat into the nearby forests or even another town where it would be harder to kill in a later turn. An unfortified spearman in the open defends with a 2.20 strength (2 x 1.1) while an unfortified spearman in forests would defend with a 2.50 strength (2 X 1.25). If the spearman was given a chance to fortify in a defensive stance then its defensive strength would be increased to either 2.750 or 3.125 respectively because of the additional fortification bonus. Clearly our best option would be to destroy this unit in the open if we could accomplish this task without compromising other objectives. Another key part of deciding what to do after Fukushima was destroyed was to provide as much of a defensive cover for the wounded chariots while pushing the advance inland toward Kyoto if at all possible. If we could move inland and capture a town, this would push our culture borders forward and release the wounded chariots so they could heal. If we could not capture a town, then the chariots would have to retreat backwards to get out of Japanese territory before they could heal and then return to help in the attack. The factors led to the decision to first attack and try to destroy the spearman and then to push units forward but to the south of the current positions. Our first moves used two chariots in sequence to attack the spearman. The chosen route of advance was over the top of the existing wounded chariots, so that if any more wounded units retreated, they could be kept in the same position for defensive purposes. The first chariot traded strokes with the veteran spearman on a one for one basis and then retreated leaving the spearman wounded at 2 / 4 strength. The second chariot attack lost one hit point out of three before defeating the spearman and earning a promoting to veteran status which left it at a 3 / 4 strength. We now had two unmoved war chariots remaining in the assault force plus a single spearman who had been intended to garrison Fukushima. A quick view of the revealed terrain showed that we could not reach and capture the Japanese worker in a single turn. Furthermore we could see the worker was in unroaded forest terrain and would probably interrupt the road construction task and retreat during the next turn. The unroaded forest tile effectively provided a defensive southern flank for our wounded units because any Japanese unit that might counter attack through those squares would be held up for at least one turn. The choice to move one of the chariots forward by just one tile was made as a cautious move to reveal a view of the tiles further to the south. If that view showed an emerging counter attack we could either strike it with our offensive strength or we could consolidate with the wounded units and try to stay out of reach. This probing move revealed no clear threat and allowed us to advance both of the remaining war chariots fully forward into the open terrain next to the forest with the worker. The intent was to provide a covering block that would prevent any possible Japanese units from reaching the wounded chariots in the next turn. As the last chariots advanced, they revealed the location of the next target town that we had guessed at in our pre-invasion plan and luckily the town was potentially in range of our next chariot strike. As a final move, we brought the spearman forward on a line toward the new town objective so that he could arrive to garrison the captured town in a few more turns. The next major sequence of moves was - The Main Combat Advance Towards Kyoto
Other related topics:
|
||||||||||||||||||||||||||||||||||||||||||||||||||||||||||||||||||||||||||||||||||||||||||||||||||||||||||||||||||||||||||||||||||||||||||||||||||||||||||||||||||||||||||||||||||
|
GOTM9 Index Items below this point
Known Bugs and Glitches |
 ©
2002 by cracker@CivFanatics.com
All rights reserved. Please read the Terms
of Use.
Send mail to our webmaster with technical
questions about or potential problems with this web site.


