|
The amphibious landing on
the horses northeast of Kyoto had now turned into a very
important part of our attack plan with a critically important mission.
Denying
the use of the Horses
Our revised mission for the this landing force was to make absolutely certain
that Tokugawa could no longer gain access to the horses that could be used to
build more horsemen to counterattack our advancing forces. I did not know how
many chariots or horsemen that the Japanese might already have, but anything
we could do to prevent more from being built would be to our advantage.
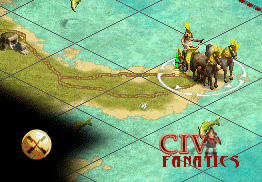 We only had four (4) units in the landing force and all of
these units were unloaded right on top of the horses in the initial assault
of 210AD. Because of the small size of the landing force, I felt that I had
to keep it together in order for it to survive and be effective. In 230AD,
all of the units could now move or fortify in place. The shape of the
peninsula meant that we had to either stay on top of the horses or pillage
the road connection in order to keep the horses separated from the Japanese.
The War Chariots could pillage the road connecting the horses and then still
be able to advance one more square. If we pillaged the road with a War
Chariot we would not be able to even mount a weak attack against a nearby
Japanese city during that turn. If we pillaged the road with the spearman or
swordsman then we would be forced to stay on top of the horses for one more
turn. We only had four (4) units in the landing force and all of
these units were unloaded right on top of the horses in the initial assault
of 210AD. Because of the small size of the landing force, I felt that I had
to keep it together in order for it to survive and be effective. In 230AD,
all of the units could now move or fortify in place. The shape of the
peninsula meant that we had to either stay on top of the horses or pillage
the road connection in order to keep the horses separated from the Japanese.
The War Chariots could pillage the road connecting the horses and then still
be able to advance one more square. If we pillaged the road with a War
Chariot we would not be able to even mount a weak attack against a nearby
Japanese city during that turn. If we pillaged the road with the spearman or
swordsman then we would be forced to stay on top of the horses for one more
turn.
I chose to pillage the
horse road with one war chariot and then advance the second war chariot
forward by one square to recon toward the hidden Japanese city. This was a
pivotal move because it revealed the Japanese city of Satsuma within one step reach for all the
units and allowed me to keep all four units together while closing to within
striking distance on the town.
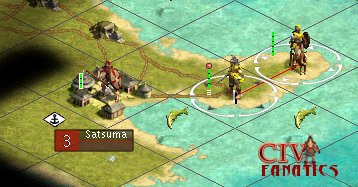 250AD – Capturing Satsuma 250AD – Capturing Satsuma
Being in close proximity to Satsuma, our forces could observe units coming
and going at the beginning of the year 250 AD. Amazingly, Tokugawa took an
archer out of the city and moved it back to the west rather than attacking
our small landing force from the safety of his city. Tokugawa also brought a
horseman out of the other coastal city and headed this unit back to the west
as well. I took this as a sign that Tokugawa (as programmed by Soren Johnson)
felt that he could be more successful if he mustered a counter attack for
against our western forces and that he felt the landing force was too weak to
have any impact on his cities.
I would have
used the archer and the horseman to attack the landing force knowing that if
the force was weakened and wounded in our territory that it would never heal
and probably could really never pose a threat to our cities. The unfortified
attacking force out in open terrain was at its weakest in the beginning of
250 AD and could only get stronger if fortified where it stood or fortified
in a captured city.
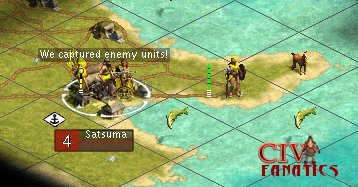 Instead of being wounded and near death, I was left with
four full strength units facing a town that I felt was defended by perhaps
two spearmen. Instead of being wounded and near death, I was left with
four full strength units facing a town that I felt was defended by perhaps
two spearmen.
I first attacked with a
War Chariot with the intent of weakening the first defender and relying on
the War Chariots retreat ability to survive. The War chariot traded hits with
the spearman but instead of retreating, it pressed on with the attack and won
before withdrawing. I then used the swordsman to attack the second spearman,
thinking this would be a fairly sure win against the last defender. The
swordsman won easily, but revealed a warrior defender. I attacked with my
final war chariot and captured the town.
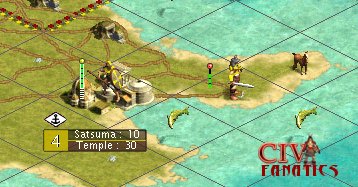 It was then just a matter of moving our elite spearman
into the town to provide a strong defense and also moving the wounded first
war chariot into the town to provide garrison. Because we now had possession
of the territory and use of the roads, I could fortify all three of the units
defending the town and gain the maximum defensive power. It was then just a matter of moving our elite spearman
into the town to provide a strong defense and also moving the wounded first
war chariot into the town to provide garrison. Because we now had possession
of the territory and use of the roads, I could fortify all three of the units
defending the town and gain the maximum defensive power.

Other related topics:
 -
hosted by CivFanatics
-
hosted by CivFanatics
-
copyrights and usage,
link to this site,
how images were prepared
|
 GOTM9 -
“Digging In” the Landing near Satsuma
GOTM9 -
“Digging In” the Landing near Satsuma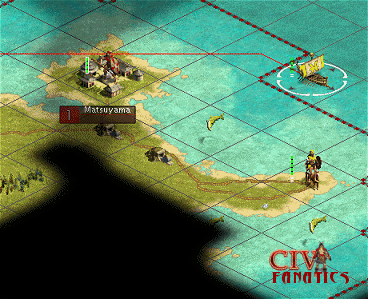
 ©
2002 by cracker@CivFanatics.com
©
2002 by cracker@CivFanatics.com