 GOTM9 -
Main Advance near Toyama
GOTM9 -
Main Advance near Toyama
|
GOTM9 Index Items below this point
Known Bugs and Glitches |
When I played the original game, I made sure to complete this move sequence after I had processed the moves to complete the Far Off Landing on the Japanese coast as well as the Coastal Thrust out to the northern Japanese coastal city of Fukushima. My feeling was that this sequence of moves was actually the most important game because it would be the most heavily reinforced element of the attack and I was hoping that it would lead to a climactic confrontation with whatever offensive military forces that Tokugawa might be able to put into the field against us. The
Importance of Roads and Passable Terrain Since we could not be
sure to find roads and/or passable terrain that would allow our chariots to
reach the major objective of capturing
The advancing workers who would build the support road would help us to reveal the positions of our enemies, and would also drive us to make choices as to which Japanese cities we eliminated first or second in order to open up terrain to build more roads.
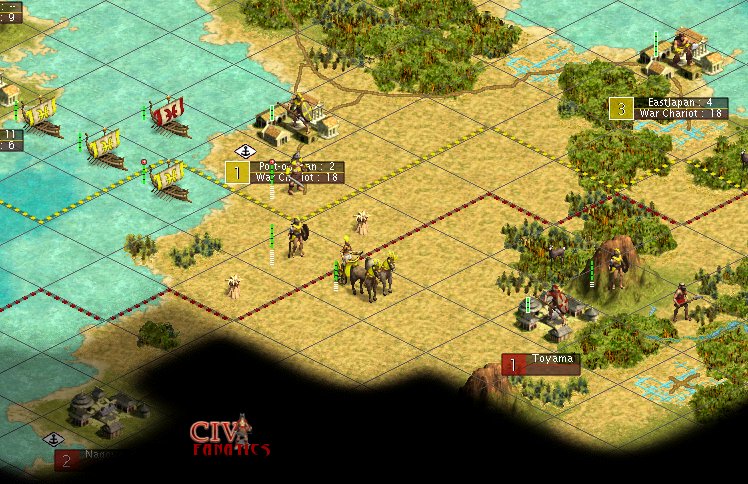
As the war begins with Japan, we have advanced a small party of one spearman and two swordsmen forward through the forest that protected the northern advance to Toyama. In the image, shown above, the borders of the Japanese territory have just expanded and reached out to envelope this small force as it stood in the forest just north of the mountain north of Toyama. Rather than wait for Tokugawa to demand that we withdraw the troops, I advanced the units onto the mountain top and prepared to go to war. The main axis of advance required us to think about the quickest possible way to get faster moving mobile wheeled units forward onto a position where they could eventual destroy the Japanese military and capture their main cities. Again in the image above, we can see that we have exposed mountains and more forest to the southwest of Toyamajust as we had originally guessed in our estimated map of the Japanese terrain. The reason for choosing to aim the attack almost straight south from Port-o-Japan would be to make sure we could take the Japanese harbor town shown at the lower left the image and then link up that new harbor to bring in the remaining troops to either advance inland through Toyama or through towns to the south of Toyama that might be more directly connected to Kyoto by a road network. The
opening attack on Toyama Since we could not be sure to find roads and/or passable terrain that would allow our chariots to have a chance of reaching the major objective of capturing Kyoto, this advance was initially very risky. I attempted to mitigate some of this risk by implementing the coastal thrust toward Fukushima that could then be turned inland toward Kyoto as resources permitted.
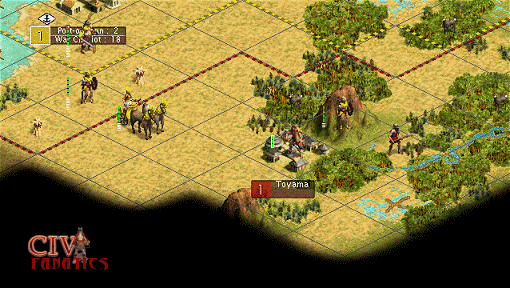
The advancing workers who would build the support road would help us to reveal the positions of our enemies, and would also drive us to make choices as to which Japanese cities we captured or eliminated next in order to open up terrain to build more roads. (Note: that the attack on Toyama reveals another program bug in CIV3 V1.12 or V1.29 where the cultural borders of the captured town or city will sometimes stay inflated beyond the 9 square base count for a town. This bug, known as the "Corona bug" is discussed in further detail in a separate article.) The attack sequence that I used in to capture Toyama is summarized below:
There is nothing spectacular about this sequence except that I observed closely and saw that the first two War Chariot attacks won 2 strokes and lost 4 for a result right at the expected 67% but the retreat percentage was higher than the expected average. The expected chance that the next war chariot might retreat would be lower in the long run, so I chose to use a swordsman from the mountain to finish one of the weakened spearmen rather than risk loosing a war chariot that might not win its battles and then choose to continue attacking and die. The final attack by the veteran war chariot was more successful than expected. When Toyama was captured we also captured the catapult and this would lead us to evaluate whether to keep the unit or disband it quickly to support rushing improvements or other units. This choice is discussed below. Consolidating moves in Toyama included using our last mountain swordsman to capture a slave worker who was then set to work building road and another move that brought the mountain spearman into the town to increase the garrison.
Addressing
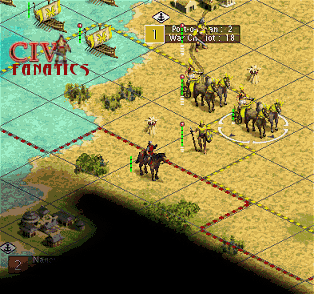
the horseman threat to the west
The choice to complete roadwork as a part of the advance now came into play because we could select and advance more road crew workers and also select and advance almost all of the available war chariots in the reserve portion of the attack force. Bringing the advancing war chariots forward quickly helped to provide cover for the wounded chariot that had defeated the first Japanese horseman and also placed us with striking distance of port town for the next turn. The next major sequence of moves was – Reinforcements and Ferry Boat Operations on the Inland Sea
Other related topics:
|

 ©
2002 by cracker@CivFanatics.com
©
2002 by cracker@CivFanatics.com
All rights reserved. Please read the Terms
of Use.
Send mail to our webmaster with technical
questions about or potential problems with this web site.