 GOTM9 - The Satsuma Amphibious Gambit
|
GOTM9 Index Items below this point
Known Bugs and Glitches |
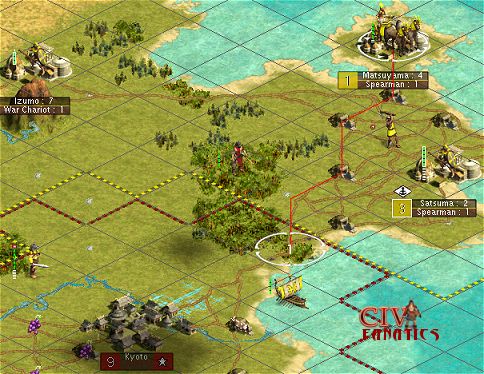
What makes this set of tactical moves exciting is not the fact that I decided to bring these units down into the attack on >Kyoto, but the combined use of land and sea routes that I used to get the fast moving chariots and the slow moving ground troops to arrive at the final attack positions at the same time. The slower moving units were experienced swordsman and spearman which would have needed to slog through three squares of enemy territory at the rate of one square per turn. The fast moving units initially included a small stack of five war chariots of various experience levels. A row of forested squares at the edge of the Japanese territory would initially slow the advance of the horse units, but once they cleared the forest they could move two squares per turn. The units in the fast portion of this attack force could reach the chosen attack point in just two moves. Because the Egyptian navy had the benefit of the Great Lighthouse, our galleys could move four squares per turn. We had two galleys in the area that had been stationed close to the Kyoto coastline in order to provide as much spying and intelligence capability as possible as we watched to see if units were escaping to or arriving from Japanese territory further to the south.
Ignoring
the archer non-threat Because the archer had the defensive bonus of the forest and the forest lacked roads, I did not want to risk a unit to attack the archer and then have the unit tied up in the forest for at least two turns. If the archer mad a move out of the forest onto an open terrain square with a road then I would kill it, but until then it could wander in the forests where it posed no immediate threat. I held back two fast attack units in Satsuma to form the garrison and also to provide enough power to make sure the archer could be killed if necessary. To potentially free up these attack units for use against KyotoI rushed the final few shields to complete spearmen in both Satsuma and Matsuyama. The remaining fast units launched out of Satsuma and >Matsuyama in 310 AD to stack and rest in the border forests before making the final advance. The foot units marched out of Satsuma and direct coastal loaded into a galley that delivered them forward adjacent to the planned landing zone on the Kyoto coast. The second galley in that area, withdrew back to the Satsuma port entrance so that it might be in a position to load and deliver the reserve fast units that had remained behind to deal with the Japanese archer if necessary. In 320 AD, (actually the end of 310 AD during the Japanese moves) the archer abandoned it attack route toward the workers and moved back south in the forest to respond to the increased threat toward Kyoto.
Consolidating
the landing
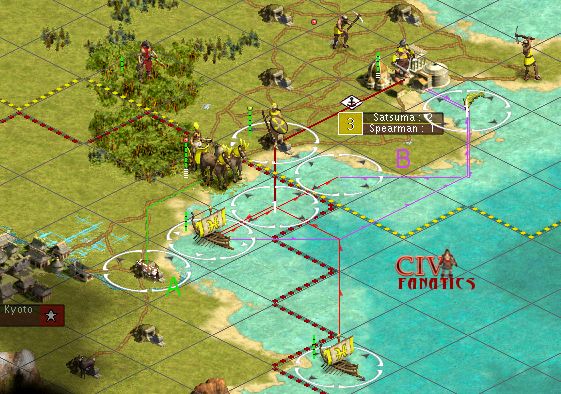
Using the available movements for the two galleys, I first moved the northern galley into the port of Satsuma and loaded the two reserve war chariots that had been freed up from the need to potentially attack the archer. By loading in port, I preserved the ability of these chariots to move and transfer between ships at sea. I then move this loaded galley out of the port and as far toward the landing zone as possible before its moves were exhausted. (magenta colored moves near point B on the map above) The galley at the landing zone had unloaded its first cargo, but still had four movements left for the turn. This allowed the galley to move two spaces up the coast and rendezvous in the same square with the loaded galley of chariots from port. Waking the chariots in the galley from port and then loading them into the landing zone galley, allowed that galley to then move the last two squares of its ability for the turn and end back in its original position, just off shore from the landing zone. I then woke the chariots for a second time and unloaded them onto the shore to join the other units in the landing zone. Using these amphibious assault moves to augment the overland attack forces effectively doubled the size of the attack force and made it possible to include units that could not possibly have reached the same position by the land route alone. As a bonus factor to these moves, the Japanese threat archer that had menaced our territory to the north, continued to move south out of the border forests and onto the grassland north of Kyoto. This archer was responding to the forces threatening Kyoto and moving into what it thought was friendly territory where it could hopefully attack our units in the next turn.
The next major sequence of moves was – The Climactic Battle to Capture Kyoto
Other related topics:
|
|
GOTM9 Index Items below this point
Known Bugs and Glitches |

 ©
2002 by cracker@CivFanatics.com
©
2002 by cracker@CivFanatics.com
All rights reserved. Please read the Terms
of Use.
Send mail to our webmaster with technical
questions about or potential problems with this web site.